How to Build a Wooden Shoe Rack: A Maritime‑Inspired DIY Guide
Building a wooden shoe rack at home is easier than you think. You just need a few tools, some solid pine, and a pinch of patience.
First, measure the space where you’ll place the rack. Most entryways need about 12‑inch tall slots, but you can tweak the height for tall boots or kids’ shoes. Cut two side panels to that height, then slice a back board that matches the width of your hallway.
Next, attach the side panels to the back board with wood glue and a few nails. A simple drill and screwdriver will do the trick. If you like a little extra support, add a middle brace – it keeps the rack from wobbling when the shoes get heavy.
Now comes the fun part: the shelves. Space them about 6‑inch apart so sneakers and sandals fit comfortably. You can use the same pine you cut earlier or grab a pre‑finished board from our handmade pine shelving collection for a quick finish.
Give each shelf a light sand and a coat of natural oil. That protects the wood from moisture and lets the grain shine. Let it dry, then bolt the rack to the wall studs for safety.
Finally, place your shoes on the new rack and step back. You’ve just added a tidy, handcrafted storage piece that looks right at home in any Nova Scotia cottage or city flat.
Step 1: Gather Materials and Tools
Before you swing a saw, take a moment to line up everything you’ll need. Having the right pieces and tools at hand keeps the project smooth and stops you from hunting for a missing screw mid‑build.
Wood and fasteners
Pick solid pine that’s been dried for at least six months. A 2‑by‑4 for the sides and a 1‑by‑4 for the shelves work well. Grab a handful of wood screws, a few nails, and a bottle of natural oil to finish the wood later.
Basic hand tools
A tape measure, a carpenter’s square, and a pencil are the three things you’ll reach for most. A handsaw or a circular saw will cut the pine to size. If you have a drill, bring a set of drill bits – they make pilot holes and speed up screwing.
Power tools that help
A cordless drill is a real time‑saver, but a manual screwdriver will do if you prefer quiet work. A sanding block or a power sander smooths each board before the oil goes on. A level makes sure the rack sits straight on the wall.
Safety gear
Wear safety glasses whenever you cut or drill. A dust mask keeps the pine dust from getting in your lungs. Ear plugs are a good idea if you’re using a loud saw.
Workspace prep
Clear a sturdy workbench or lay a drop cloth on the floor. Keep a bucket for wood shavings and a rag for wiping the oil. Having a clean space reduces accidents and makes clean‑up easier.
Take a quick look at the pine grain. Choose boards where the grain runs straight and there are no big knots. Straight grain makes the rack stronger and easier to sand.
Before you start, make sure the saw blade is sharp. A dull blade can tear the wood and make the cut uneven. A quick file or a fresh blade saves time and gives a cleaner edge.
Now you’ve got a checklist you can print or pin to the wall. When you’re ready, the next step is to cut the pieces to the right size and start putting the rack together.
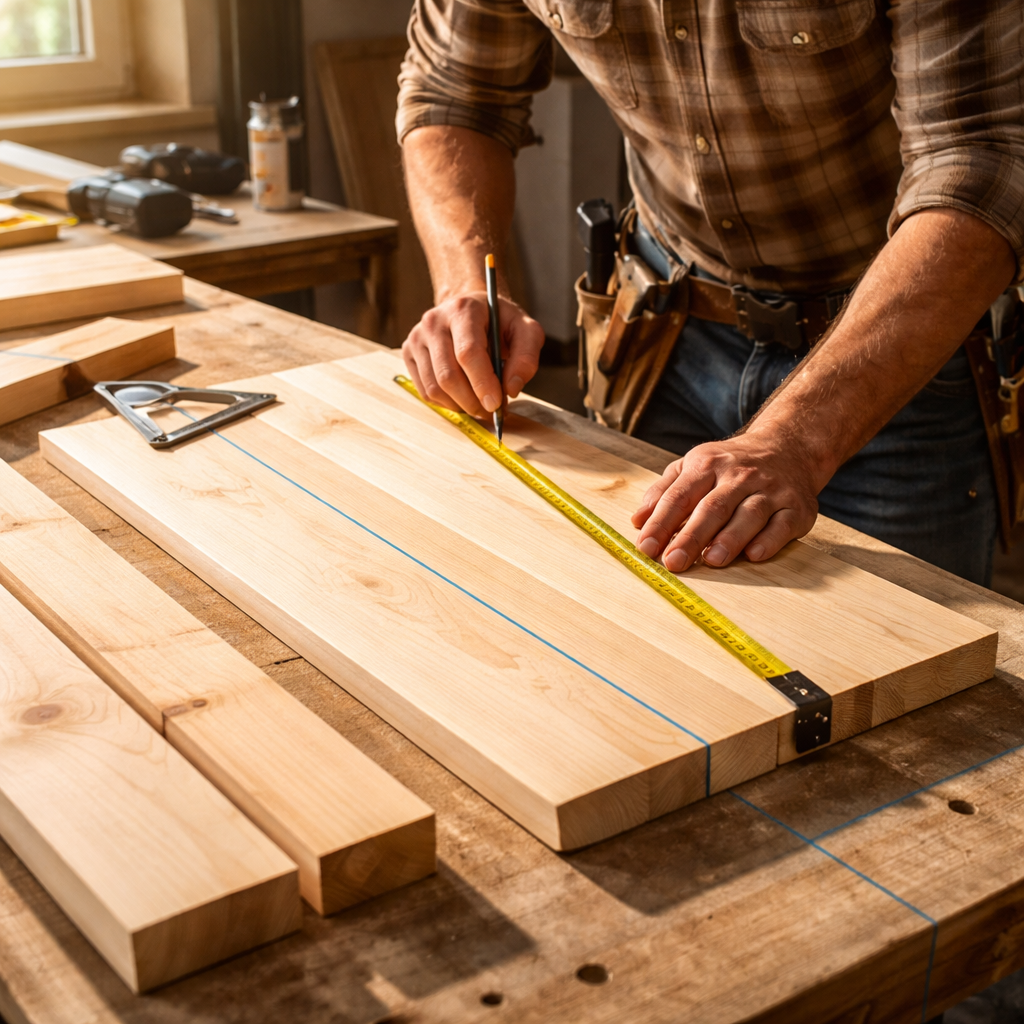
Step 2: Cut and Prepare the Boards
Now that you’ve measured everything, it’s time to turn the pine into the shape you need. A clean cut makes the whole rack look solid and tidy.
Grab a pencil, a carpenter's square, and your saw. Snap a line where each board should end to the side panels at the height you wrote down, the back board to match the width of your hallway. Double check the line before you cut; a quick glance can save a wasted piece.
When you’re ready, set the board on a stable surface and pull the guard of your circular saw or hand saw. A steady, even push gives a straight edge. If a saw feels scary, many local shops will cut to size for a few dollars and no shame in that. For more tips see this cutting guide.
For a little extra safety, wear glasses and a dust mask. Keep your fingers clear of the blade and let the saw do the work. A smooth, slow motion reduces tear out and keeps the wood grain nice.
Before you sand, use the carpenter’s square to see if each board sits true. Place the square at the end of a cut; if there’s a gap, trim a little more. This quick test keeps the rack from wobbling later.
After each cut, grab a piece of 120-grit sandpaper. Rub the edge until the rough spots fade. Switch to 220-grit for a soft finish that feels good to the touch. Wipe away the dust with a damp cloth so the oil you’ll use later spreads evenly.
Once the edges feel smooth, give the whole board a light wipe with a tack cloth. Removing fine dust helps the natural oil soak in evenly when you get to the finishing step.
If you don’t have a fence, clamp a straight scrap board alongside the cut line. It acts like a guide and keeps the saw from wandering, especially on longer pieces.
Give every board a quick visual check. Are the edges straight? Does the length match the marks? If something looks off, a little extra sanding can fix it, but a major mismatch means you’ll need to recut.
Step 3: Assemble the Frame
Now the pieces are clean and measured, it’s time to bring them together. Grab a flat surface, lay out the side panels, back board, and the shelves you just sanded. A quick visual check helps you see any gaps before you start nailing.
First, position the two side panels upright and lean the back board against them. Use a carpenter’s square at each corner – if the edges line up, you’re good to go. If you spot a wobble, a tiny trim will save you a lot of re‑work later.
Next, apply a thin bead of wood glue where the panels meet. You don’t need a lot; a little goes a long way. Press the joints together and hold them with a few clamps for about 10 minutes. This gives the glue a head start before you add the nails.
Now for the shelves. Slide each shelf into its slot, making sure it sits flush with the front edge. Tap it gently with a rubber mallet if it needs a tiny nudge. Once it feels solid, drive a couple of finishing nails through the side panel into the shelf. A nail gun works fast, but a hammer and nail set work just as well.
Do you wonder which wood will hold up best? pick the right wood based on strength and how it reacts to moisture. Here’s a quick look:
| Wood Type | Strength | Notes |
|---|---|---|
| Pine | Light | Easy to work with, great for casual style |
| Oak | High | Very durable, handles heavy boots well |
| Cedar | Medium | Natural scent, resists moisture and odor |
Give each joint a final check with the square. If the corners stay tight, add a second nail or two for extra grip. Then wipe away any excess glue with a damp cloth – you don’t want it to dry on the surface.
Finally, let the frame sit for about 30 minutes before you move on to the finishing step. This short pause lets the glue set and ensures the rack stays square when you attach the wall brackets later.
Feel that? The frame is taking shape, and you’re just a few steps away from a sturdy, home‑grown shoe rack you can be proud of.
Step 4: Finish, Paint, and Install the Rack
Now the frame feels sturdy, so let’s give it a nice finish and get it ready to hang. A smooth surface will make the wood look proud and keep shoes from snagging.
First, give each joint one last wipe with a clean cloth. Any dust left will stop the paint from sticking. Lightly sand any rough spots with 220‑grit paper – just enough to feel smooth to the touch.
Pick Your Paint
Pick a paint that matches the vibe of your home. A matte chalk paint hides small dents, while a satin oil‑based paint brings out the grain. If you love the natural look, a clear water‑based seal works great. Test a tiny dab on a hidden spot; see how the colour looks in the light of your entryway.
Apply the Finish
Use a small foam brush – it spreads paint evenly and avoids brush marks. Load the brush, then swipe in the direction of the wood grain. One thin coat is better than a thick one; it dries faster and stays even. Let it dry for about an hour, then add a second coat if you need deeper colour.
While the paint dries, you can step back and picture how the rack will look against the wall. Does it feel bright enough? Does it blend with your floor?

Mount the Rack
When the paint is fully dry, grab a stud finder and locate the studs behind your wall. Mark the spots with a pencil. Hold the rack up to the wall, line the brackets with the marks, and drill pilot holes through the pre‑drilled bracket holes.
Secure each bracket with 2‑inch wood screws. Tighten until the rack feels solid, but don’t over‑tighten – you don’t want to strip the wood. Step back, check that the rack sits level with a bubble level, and adjust if needed.
Finally, give the whole piece a quick once‑over with a dry cloth to remove any stray dust. Your new shoe rack is ready to hold boots, sandals, and everything in between.
Feel proud – you just built a piece that blends function and maritime charm. If you ever need more hand‑crafted wood pieces, Atlantic Wood N Wares has a range of shelves and accents made right here in Nova Scotia.
Conclusion
Now you’ve walked through every step of how to build a wooden shoe rack, from measuring the space to hanging the finished piece.
Remember, a solid frame starts with straight cuts and a little sand. A thin coat of oil or paint protects the grain and lets the wood shine. And the final mount on studs keeps the rack safe for heavy boots.
If a step feels shaky, pause and check the joint with your square and a quick fix saves a lot of hassle later.
Once it’s up, you’ve added a piece that feels personal and fits right into a Dartmouth home.
Feel proud of the result, and let it inspire your next DIY project. Need more hand-crafted ideas? Keep exploring the craft. You might even gift a matching rack to a neighbor and spread that coastal charm. Sharing the joy of a handmade piece keeps the tradition alive.
FAQ
How long does it take to finish a wooden shoe rack?
Most people finish the rack in a weekend. You cut, sand, glue, and nail the pieces on day one. Let the glue dry, then sand again and apply oil or paint on day two. If you add extra steps like staining, add another day. So plan for 1‑2 days of work and a few hours of drying time. Make sure you have a clear workspace so you don't lose small parts.
What tools do I really need for how to build a wooden shoe rack?
To build a wooden shoe rack you only need a few basics. A handsaw or circular saw cuts the pine, a drill makes pilot holes, and a screwdriver drives the screws. A tape measure, square and pencil keep your cuts straight. You’ll also want sandpaper, a brush and some natural oil for the finish. A clamp helps hold joints while the glue sets, but you can skip it if you press firmly.
Can I use reclaimed wood instead of fresh pine?
Reclaimed wood adds character and is easy on the planet. Look for boards that are straight and free of rot. You may need to sand more to remove old paint or nail heads. Make sure the wood is dry before you cut, otherwise it can warp later. The same joints and glue work just as well with reclaimed pine as with fresh lumber.
How do I finish the rack so it resists water?
Finishing the rack protects it from spills and humid air. A simple oil like boiled linseed or tung oil soaks into the grain and keeps water out. Apply a thin coat with a brush, let it dry for an hour, then rub another light layer. If you prefer a painted look, use a water based sealant that’s low odor and let each coat cure fully before the next.
What is the best way to mount the rack safely on a wall?
Mounting the rack safely starts with finding the studs behind your wall. Use a stud finder and mark the centers. Pre drill holes through the rack’s mounting brackets, then screw 2 inch wood screws into the studs. If you can’t locate a stud, use a wall anchor rated for the weight of the rack plus shoes. Check the rack with a level so it sits straight.
How can I customize the rack to match my home décor?
Customizing the rack lets it blend with your décor. You can paint it a colour that matches your front door or leave the natural pine for a coastal vibe. Adding a simple metal hook at the bottom gives a spot for umbrellas. If you like a personal touch, stencil a small seashell or lighthouse silhouette on the back panel, it’s quick and adds charm.


