How to Make a Wooden Key Holder: A Cozy Maritime Workshop Guide
Making a wooden key holder at home is easier than you think. You only need a few pieces of pine, a couple of hooks, and a dash of patience. In a few hours you can turn raw wood into a tidy entry‑way piece that feels personal and sturdy.
Most of the frustration comes from not knowing where to start. You might picture a complex joinery job, but a simple butt joint with wood glue works fine for a wall‑mounted holder. Imagine the satisfaction of hanging your keys on a piece you crafted in your own kitchen.
Here’s what you’ll learn in this guide. First, we’ll walk you through picking the right wood grain that matches a Maritime‑inspired home. Then you’ll see how to cut, sand, and finish the board so it resists the salty air of a Nova Scotia cottage. Finally, we’ll show a quick way to attach three sturdy hooks that hold car, house, and office keys without wobbling.
If you prefer a ready‑made example to spark ideas, check out our hand‑painted wooden key holder. It blends a cozy village scene with practical hooks, proving that function and art can share the same wall.
Grab a saw, some sandpaper, and a bottle of clear oil. Measure the space above your entryway, cut the board a few inches longer than the hooks, sand smooth, coat, and let dry. Screw the hooks in, hang the holder, and enjoy a tidy, handcrafted touch that welcomes you home each day.
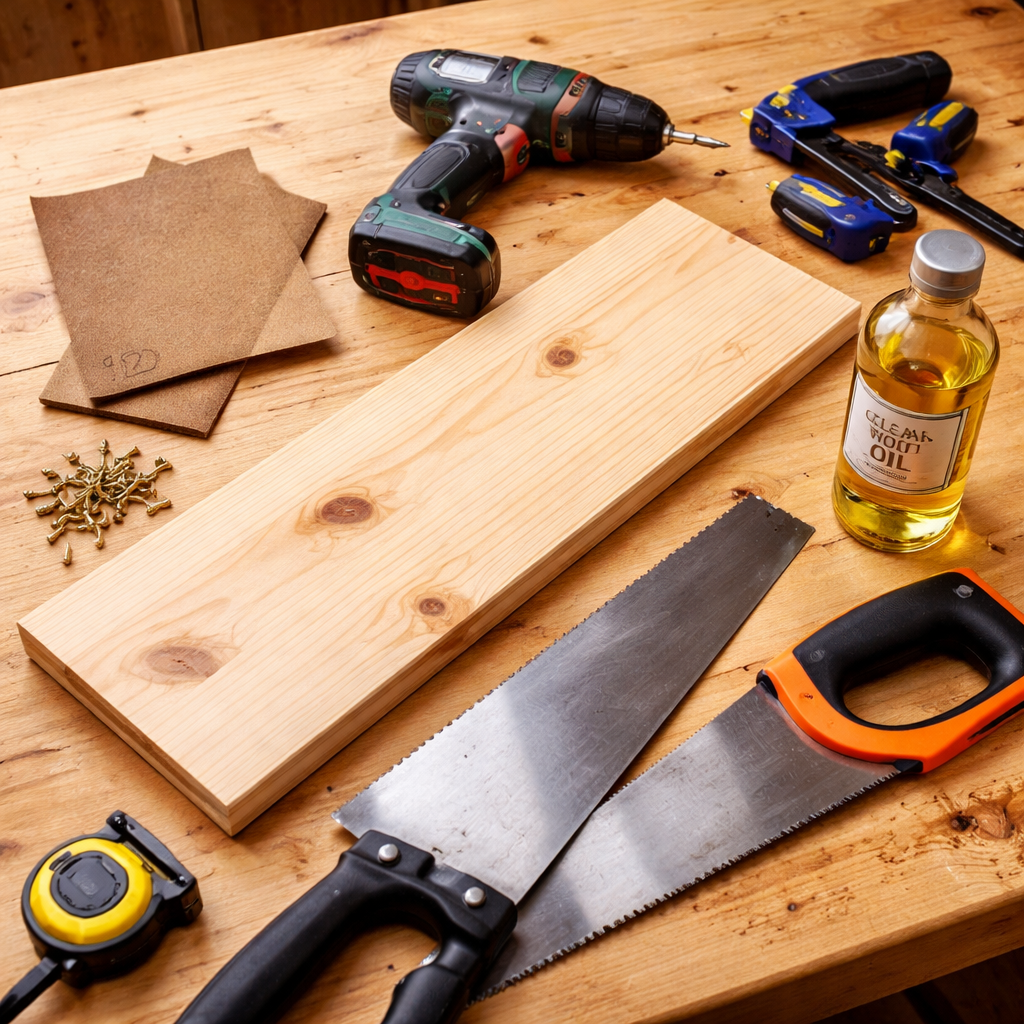
Step 1: Gather Materials and Tools
First, decide the size of the board. A piece of pine about 12×4 inches works for most entryways. Measure the spot above your door, then cut a little extra – you can always trim later.
Grab a handsaw or a small circular saw. A saw with a fine tooth gives clean cuts and feels safe in a home workshop. If you have a table saw, set the blade height low and push slowly.
Next, pull out a sheet of medium‑grit sandpaper. Rub each side of the board until it feels smooth to the touch. A smooth surface helps the finish stick and makes the holder look polished.
For the hooks, simple metal coat hooks do the trick. Choose ones with a curved arm so keys slide off easily. You’ll need a drill with a bit that matches the screw size, plus a screwdriver.
Don’t forget wood glue and a couple of clamps. A dab of glue on the joint, then a firm squeeze from the clamps, gives a strong bond without any fancy hardware.
Finally, pick a finish. A clear oil or a matte varnish protects the wood from salty air if you live by the coast. Apply a thin coat, let it dry, then add a second coat for durability.
Tip: If you’re not sure which finish to pick, a local craft store can suggest a low‑odor oil that stays clear for years.
Once everything is on the bench, lay it out in the order you’ll use it. Seeing the board, sandpaper, saw, glue, clamps, hooks, drill, and finish together helps you spot any missing piece before you start.
Take a moment to double‑check that you have each item. A quick inventory saves a trip to the shop mid‑project.
Step 2: Cutting and Shaping the Wood
Now the board moves from raw slab to a piece that will live on your wall. Grab a fine‑tooth saw or a circular saw if you have one. Mark the cut line with a pencil, then double‑check the length against the space above your door.
And here’s a quick safety tip: keep your fingers clear of the blade and wear a pair of safety glasses. A steady hand and a slow, even push give you a clean cut without splintering.
Once the board is the right length, set it on your workbench and score a shallow groove where each hook will sit. A ¼‑inch deep groove helps the hook sit flush and stay strong. Use a small drill bit to make pilot holes for the screws; this stops the wood from cracking.
Now sand the cut edges. Start with 120‑grit sandpaper to smooth rough spots, then finish with 220‑grit for a silky feel. Wipe away dust with a damp rag before you move on to finishing.
Give the board a quick wipe with a dry cloth to pull off any lingering grit. A clean surface lets the oil soak in evenly later.
Does the shape feel right? Hold the board up to the wall and picture the hooks. If it looks a bit tall, a quick trim will fix it. A few extra minutes now saves a wobbly holder later.
You’ll notice the grain now runs smooth, ready for a light coat of oil that will protect it from the coastal breeze.
Take a step back, admire the shape, and move on when it feels just right.
Tools and Tips at a Glance
| Tool | Purpose | Quick Tip |
|---|---|---|
| Pencil | Mark cut lines | Use a ruler for exact measurements |
| Saw (fine‑tooth or circular) | Cut board to length | Push slowly; let the blade do the work |
| Drill with small bit | Make pilot holes for hooks | Keep bits upright to avoid wandering |
| Sandpaper (120‑220 grit) | Smooth edges | Finish with higher grit for a soft touch |
When the board is cut, grooved, and sanded, you’re almost ready to attach the hooks so it stands up to salty sea air and daily use.
Step 3: Assembling the Holder
Now the board is smooth and ready. It’s time to turn that plain piece of pine into a functional holder.
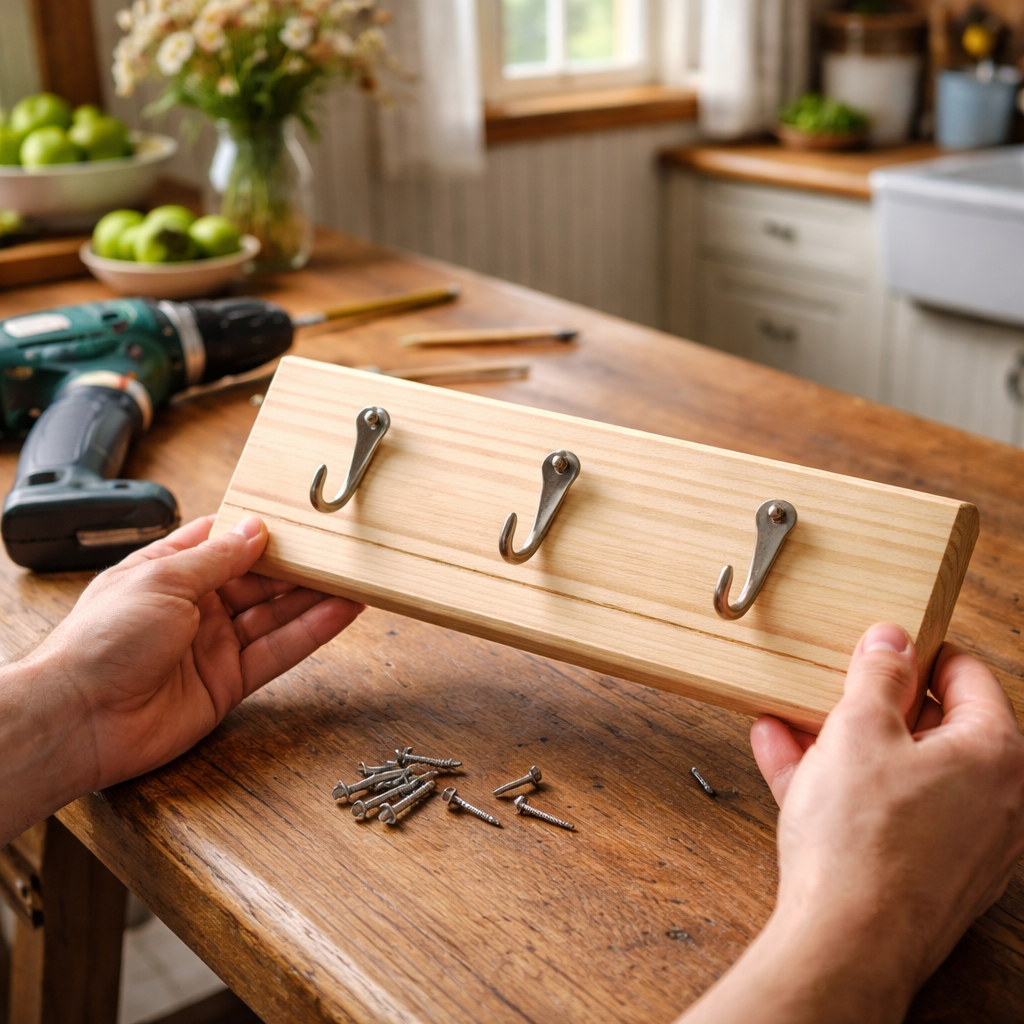
First, line up the three hooks where the groove runs. A quick tap with a hammer lets you see the exact spot before you drill.
Grab a drill and a 3‑mm bit. Drill a shallow pilot hole at each mark. The hole stops the wood from splitting when you screw the hook in.
Next, screw each hook in place. Turn the screw clockwise until the hook sits flush with the board. If you feel resistance, back off a turn and try again – you want the hook snug but not stripped.
A tip many DIY fans swear by: use a small piece of scrap wood as a washer under the screw head. It spreads the pressure and keeps the hook from wobbling over time.
Now give the whole piece a quick once‑over. Check that each hook is level. A simple spirit level or even a phone app will do. If one hook sits lower, loosen that screw, shift it a millimetre, and tighten again.
Does it feel sturdy enough for a set of heavy keys? Give it a gentle pull. If it holds firm, you’re good to go.
If you like a bit of extra charm, paint the back of the board with a wash of soft blue or add a tiny carved motif that matches a coastal theme. The paint won’t affect the hook strength, but it adds a personal touch that fits a Maritime home.
Finally, pick a spot on your wall that’s at eye level. Use a stud finder or a wall anchor to hang the holder. Once it’s up, slide your keys onto the hooks and step back. You’ve just made a wooden key holder that looks handmade and lasts.
Step 4: Finishing Touches and Personalization
Now the holder is ready for the little details that make it yours. A final coat of oil or wax will keep the pine happy and guard it from salty air.
Pick a finish you love. A clear oil lets the grain shine, while a matte wax gives a soft feel. Apply a thin layer with a clean cloth, let it soak for a minute, then wipe off excess. Let it dry for at least an hour before you touch the hooks.
Color or carving for style
If you want a splash of colour, dip a soft brush in a wash of pale blue or sea‑foam green. Paint only the back or the edges so the front stays natural. You can also carve a tiny shell or wave pattern near the top. A simple hand‑drawn line adds a coastal vibe without hurting the strength of the board.
Label or tag
Many of our customers add a small wooden tag with their family name or a short quote. Drill a tiny hole near a corner, slip in a thin tag, and secure it with a tiny nail. It feels personal and makes a great gift for a new home.
Before you hang the piece, give it a quick check. Grab the key set you plan to use. Slip each key onto its hook. Does each key sit comfortably? If a key drags, loosen that screw a touch and move the hook a millimetre.
Choose the spot on your wall. Eye level works best for most people. Use a stud finder or a simple wall anchor if you’re not on a stud. Screw the holder in, step back, and admire the work.
Now you have a wooden key holder that looks hand‑made, feels sturdy, and carries a piece of your own style. It’s a small project that adds a warm, Maritime touch to any entryway.
Conclusion
Now you’ve turned a raw pine board into a piece that greets you every time you walk in.
Remember the three things that matter most: a clean cut, a smooth finish, and hooks that sit just right. If a hook feels tight, loosen it a hair and try again. A quick test with your keys will tell you if it holds.
When the holder finds its spot, step back and let the simple shape speak for itself. The calm of a coastal home lives in those tiny details.
Feeling proud? Share a photo with friends or on social media – it might inspire another DIY fan.
And if you ever need a ready‑made piece that matches the same Maritime vibe, Atlantic Wood N Wares offers handcrafted key holders made in Nova Scotia.
Enjoy the small joy of a handmade touch each day.
It’s a tiny project that adds big comfort to your home.
FAQ
What tools do I need to make a wooden key holder?
First, grab a fine‑tooth handsaw or a small circular saw for cutting the pine board to length. You’ll also need a drill with a tiny bit for pilot holes, a screwdriver, and a set of wood screws that match the hook size. A piece of sandpaper (120‑220 grit), a clean cloth, and a brush for oil or wax finish round out the kit. Having a safety glass and a dust mask keeps the job safe.
How do I choose the right pine board for a coastal look?
Pick a board that shows a tight, even grain – it catches the light and feels smooth to the touch. A 12‑inch by 4‑inch piece of Canadian pine works well in most entryways and gives a hint of the coast without looking raw. If the wood has a faint yellow hue, a light coat of clear oil will bring out that warm maritime feel.
Can I finish the key holder with oil instead of paint?
You can finish the piece with oil, wax, or a thin wash of paint – all work fine as long as the surface is clean. Oil seeps into the pores of pine, giving a soft sheen that protects against salty air. Wax adds a matte feel and is easy to reapply. If you prefer a splash of colour, a pale blue brush‑stroke on the back keeps the front natural while still matching a coastal vibe.
How do I attach the hooks so they stay strong?
Drill a shallow pilot hole for each hook, then screw the hook in until it sits flush with the board. Turn the screw clockwise, then back off a tiny turn if it feels tight, you want the metal to hold without stripping the wood. Adding a tiny wood washer under the screw head spreads the pressure and stops the hook from wobbling over time.
What are common mistakes to avoid when sanding?
Sand in two stages: start with 120‑grit to knock down rough cuts, then finish with 220‑grit for a silky touch. Don’t sand too hard; you’ll round off the grain and lose the natural look. Always wipe the dust off with a damp rag before moving on, otherwise the oil finish will trap grit and feel gritty to the fingers. A quick test is to run your fingertip over the surface; it should feel smooth, not rough.
How can I personalize the holder without hurting its strength?
Personal touches like a painted wave or a small carved shell add charm without weakening the board. Keep any paint or carving to the back or edges, leaving the front where the hooks sit untouched. You can also slip a thin wooden tag with a family name through a tiny hole near a corner, it’s a sweet detail that stays firm and fits the maritime vibe.


