Exploring Wood Flower Art: A Handcrafted Guide for Maritime Gifts
Imagine walking into a room and instantly feeling the calm of a seaside garden, but without any wilted petals or water spills. That’s the quiet magic of wood flower art – a piece that brings nature indoors and stays vibrant year after year.
We get it: you’ve spent countless hours scrolling for the perfect décor, only to end up with something that looks good for a week and then fades. Maybe you’ve even tried fresh bouquets for a dinner party, only to watch them droop under the dining‑room lights. You’re not alone. A lot of home‑decor lovers in Nova Scotia and beyond wrestle with the same dilemma – wanting lasting beauty without the upkeep.
Here’s what we’ve learned from the many families who’ve switched to handcrafted wooden blooms. First, the texture of solid pine, hand‑carved and then sealed with Benjamin Moore Aura paint, holds up against Atlantic humidity and the occasional splash of coffee. Second, the colour saturation stays true because each petal is painted individually, not sprayed in a batch. That attention to detail turns a simple wall piece into a conversation starter.
If you’re wondering where to start, try this three‑step approach: 1) Identify a focal spot – perhaps the entryway where you greet guests, or a mantle that needs a splash of colour. 2) Choose a size that complements the space; our Handcrafted Nova Scotia Wood Flower Art comes in small, medium, and large, so you can match the scale of your wall. 3) Hang it at eye level and add a soft lamp nearby to highlight the painted details.
Real‑world example: a coastal‑themed cottage in Dartmouth recently swapped a generic canvas for a medium‑sized wood flower piece. The homeowner reported that visitors comment on the “warm, inviting vibe” within seconds of stepping inside. Another client, a newly‑weds couple, used a set of three small wooden flowers as a unique backdrop for their wedding photos – the pieces were sturdy enough to stay in place all day, and the colour palette matched their sea‑foam wedding theme perfectly.
Quick tip: dust the surface with a dry microfiber cloth weekly. If a spot gets stubborn, a barely‑wet cloth with mild soap does the trick – no varnish needed, thanks to the paint’s protective layer. And if you ever move the piece, keep it upright to avoid warping.
So, whether you’re a “Coastal Grandmother” craving a touch of the ocean or a first‑time homeowner looking for a timeless accent, wood flower art offers a low‑maintenance, high‑impact solution. Ready to bring that serene, evergreen garden feel into your space?
TL;DR
Wood flower art brings the calm of a seaside garden into any room, offering lasting colour, low‑maintenance charm, and a handcrafted touch that resonates with Nova Scotia’s coastal spirit.
Choose the right size, hang at eye level, and dust weekly for a vibrant, evergreen centerpiece that brightens your home daily.
Step 1: Selecting Sustainable Wood and Materials
Ever stood in a timber yard and felt a tiny thrill when you spot that perfect piece of pine? That moment is the first step toward wood flower art that lasts through Atlantic winters and summer breezes. It’s not just about any wood – it’s about choosing responsibly sourced, stable timber that honors the coast we call home.
We start with Canadian pine because it’s abundant in Nova Scotia, has a fine grain that holds paint beautifully, and ages gracefully. Look for stamps that say the wood comes from a certified forest – the FSC or local sustainable harvest labels are your green light. When the grain runs straight and the knots are tight, you know the piece will resist warping once it’s painted and hung.
But how do you know if a board is truly stable? A quick moisture test does the trick. Grab a small moisture meter (they’re cheap at most hardware stores) and aim for a reading between 8% and 12% – that range matches the indoor humidity of most Nova Scotian homes. If it’s higher, the wood will shrink or swell when the season changes, and your wooden blossoms could end up looking lopsided.
Once you’ve got the right pine, think about the finish. Our artisans use Benjamin Moore Aura paint because it seals the wood and stands up to the salty air that drifts inland from the Bay of Fundy. The paint’s built‑in durability means you won’t need a separate varnish, keeping the natural feel of the wood intact.
Here’s a quick checklist you can hang on your workbench:
- Certified sustainable source (FSC or local label)
- Moisture content 8‑12%
- Straight grain, tight knots
- Pre‑treated with a low‑VOC primer (optional)
- Painted with weather‑resistant Benjamin Moore Aura
Does any of that sound a bit technical? Don’t worry – we’ve walked this path with dozens of coastal grandparents and new‑home buyers, and the process becomes second nature after a few projects. In fact, one of our longtime customers in Lunenburg told us that the only thing they had to worry about after installation was deciding where to place the lamp that highlights the petals.
Another tip: if you’re buying raw lumber online, request a short video of the wood being inspected. Seeing the grain move under light gives you confidence you’re not getting a warped slab hidden behind a photo. And if a supplier can’t provide that, it’s usually a sign to look elsewhere.
When you’re ready to cut, use a fine‑toothed saw and let the blade do the work – a clean cut means the edges won’t chip when you start carving the individual petals. Many of our craftsmen swear by a Japanese pull saw for its precision, but a good quality circular saw with a fine blade works just as well for larger sheets.
Finally, store your timber flat, off the ground, and covered. A simple wooden pallet with a breathable tarp on top keeps dust out while allowing the wood to breathe. If you need to stack pieces, place a thin sheet of cardboard between each layer to avoid surface dents.
So, what’s the takeaway? Choose certified Canadian pine, check moisture, treat with durable paint, and store it right. Follow those basics and you’ll set a solid foundation for wood flower art that feels like a fresh sea breeze every time you look at it.
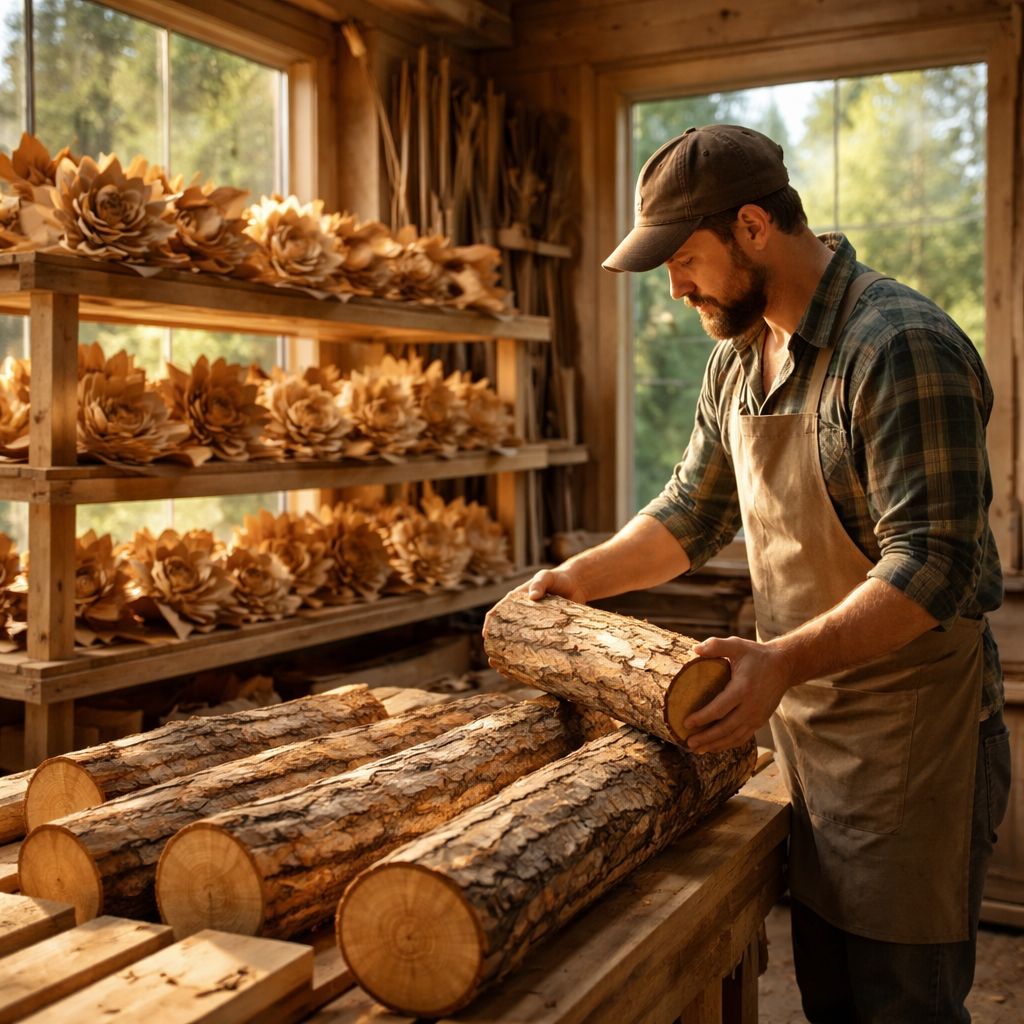
Step 2: Hand‑Carving the Floral Forms
Let’s get honest about this part. Hand‑carving the floral forms is where wood flower art becomes tactile magic. In our Dartmouth workshop, the pine yields to careful touch, petal by petal, and that moment is exactly why we love these pieces.
So what tools do you need to shape something that feels delicate and alive? Gather sharp, comfortable tools: a fine carving knife, small gouges (3mm and 6mm), a micro chisel, a sharpening stone, a carving mallet, and sanding blocks (120, 180, 220). A steady vise or clamps keep the wood from wandering as you work. And yes, keep a damp cloth handy to wipe away shavings as you go—you’ll thank yourself later.
Tools and setup
- Sharp carving knife for clean edges
- Small gouges (3mm, 6mm) for petal shaping
- Micro chisel and fine files for detailing
- Carving mallet and clamps to secure the block
- Sandpaper blocks: 120, 180, 220 for finishing touch
- Sharpener and a damp rag to keep your tools in top shape
Prep the wood. Check moisture content and aim for 12% or lower for indoor decor. Pine is forgiving, but if it’s too damp or too dry, you’ll fight warps and tear‑out as you work. A stable block makes the petals sing instead of protest.
Shape the outline
Lightly trace a petal outline on the face you’ll carve. Keep the lines simple at first; you’ll refine later. Work from the outer edge inward, always cutting toward the center to avoid tear‑out. Use a larger gouge to remove waste and form the basic petal shapes, keeping the grain running in a natural arc so the petals curve with the wood’s own history.
Refine contours and veining
Switch to finer tools. Carve the inner ridges and gentle curves that give petals their natural twist. The small gouges help reproduce subtle veins—don’t overdo it, just a light pass to catch the light. Leave a touch of variation among petals to mimic nature; a few petals slightly longer or more curved read as hand‑made and alive.
Safety and care. Keep blades sharp; a dull tool slips and ruins a delicate edge. Work slowly, especially with thin sections near the tips. Clamp the piece firmly so your hands stay safe and the sculpture stays true to the design. If you nick a petal, don’t panic—you can re‑carve that section rather than forcing an awkward bend.
Finishing touch and finish
After you’re happy with the shape, wipe away the dust and do a gentle test‑fit of the surface feel. Lightly sand with 180–220 grit until the grain just whispers. Then seal with a few thin coats of low‑VOC Benjamin Moore Aura. The paint not only adds color but also seals against Atlantic humidity, helping wood flower art stay vibrant longer. Let each coat dry, then lightly sand before the next layer.
Want a quick reference? A short hand‑carving walkthrough can be a helpful visual, like this hand‑carving demo. hand‑carving demo. For finer petal shaping tips, this video is another solid resource. petal shaping tips.
Real‑world examples from our collection
In a coastal doorway installation, we carved a six‑petal bloom with a soft, wave‑like curve to catch the afternoon light. The piece stays flat, shows off the grain, and holds color beautifully after painting. Another set of three smaller petals above a mantel evokes sea breeze and looks effortlessly organic, never stiff.
So, what’s next? In Step 3 we’ll bring all that texture to life with color—hand painting the petals to complete the look while preserving the carved depth that makes wood flower art feel so tactile.
Step 3: Painting and Finishing for a Coastal Look
When you stare at that freshly carved petal, you probably feel a mix of excitement and a tiny knot of doubt – "Will the colour really capture that breezy shoreline vibe?" Trust me, you’re not alone. The magic of wood flower art lives in the paint, and a few mindful steps can turn a good piece into a conversation‑starter.
First things first: give the wood a gentle wipe down. A dry microfiber cloth will lift any sanding dust without smearing the grain. If a spot looks stubborn, a barely‑damp rag does the trick – just be sure the surface is dry before you reach for the brush.
Choosing the Right Paint
We swear by low‑VOC, water‑based paints because they respect both your indoor air and the Atlantic humidity that sneaks in through open windows. Benjamin Moore Aura is a popular pick in our workshop; it layers smoothly, dries hard, and resists the occasional salty spray from a nearby harbour.
But you don’t have to limit yourself to one brand. Here’s a quick snapshot of three paint families that play nicely with coastal décor:
| Paint family | Finish | Why it works for a seaside vibe |
|---|---|---|
| Low‑VOC water‑based (e.g., Benjamin Moore Aura) | Satin or matte | Soft sheen mimics drift‑wood, easy to touch without glare |
| Chalk paint (e.g., Annie Sloan) | Matte | Creates a weathered, beach‑house patina that ages gracefully |
| Exterior acrylic (e.g., Sherwin‑Williams Duration) | Satin | Extra moisture resistance for homes right on the shoreline |
Pick a finish that matches the mood you’re after. A satin sheen catches a little light, perfect for a sunny mantel, while matte feels more like a seashell‑kissed shore.
Mixing Colours Like a Tide
Instead of spraying a uniform hue, we hand‑paint each petal. This lets the grain peek through, just like waves revealing shells underneath. Start with a base coat that reflects your favourite coastal colour – think sea‑foam, sunrise coral, or stormy slate. Then, while the base is still tacky, dab a lighter or darker shade on the edges. The subtle gradient mimics natural petal shading.
Pro tip: use a small, synthetic brush (size 2 or 3) for detail work. It gives you control without splattering, and the bristles hold enough paint to glide over the carved surface.
Sealing the Look
Once your colour layers have cured (24‑48 hours is a safe bet in a Nova Scotia kitchen), it’s time to protect. A thin wipe‑on coat of the same low‑VOC Aura you used for the base creates a seamless skin that guards against humidity, sunlight, and the occasional coffee ring.
Apply the sealant with a clean, lint‑free cloth, working in the direction of the wood grain. Lightly sand with 220‑grit sandpaper between coats – you’ll hear a faint whisper of the grain, a reminder that you’re still working with real wood, not a printed image.
Quick Checklist
- Wipe surface clean, let dry completely.
- Choose a low‑VOC paint that matches your coastal palette.
- Apply a thin base coat, let it become tacky.
- Hand‑paint each petal with subtle gradients.
- Allow 24‑48 hours drying time between colour layers.
- Seal with a wipe‑on low‑VOC finish, sand lightly between coats.
In our experience, the combination of a matte satin finish and hand‑layered colour gives the wood flower that breezy, lived‑in look without looking over‑done. It also holds up when you hang the piece near a window that lets the Atlantic breeze drift through.
So, what’s the next step after you’ve sealed the piece? Let it rest for a day, then hang it at eye level where the light can dance across the painted petals. You’ll notice how the colour shifts as the sun moves – that’s the coastal look alive in your home.
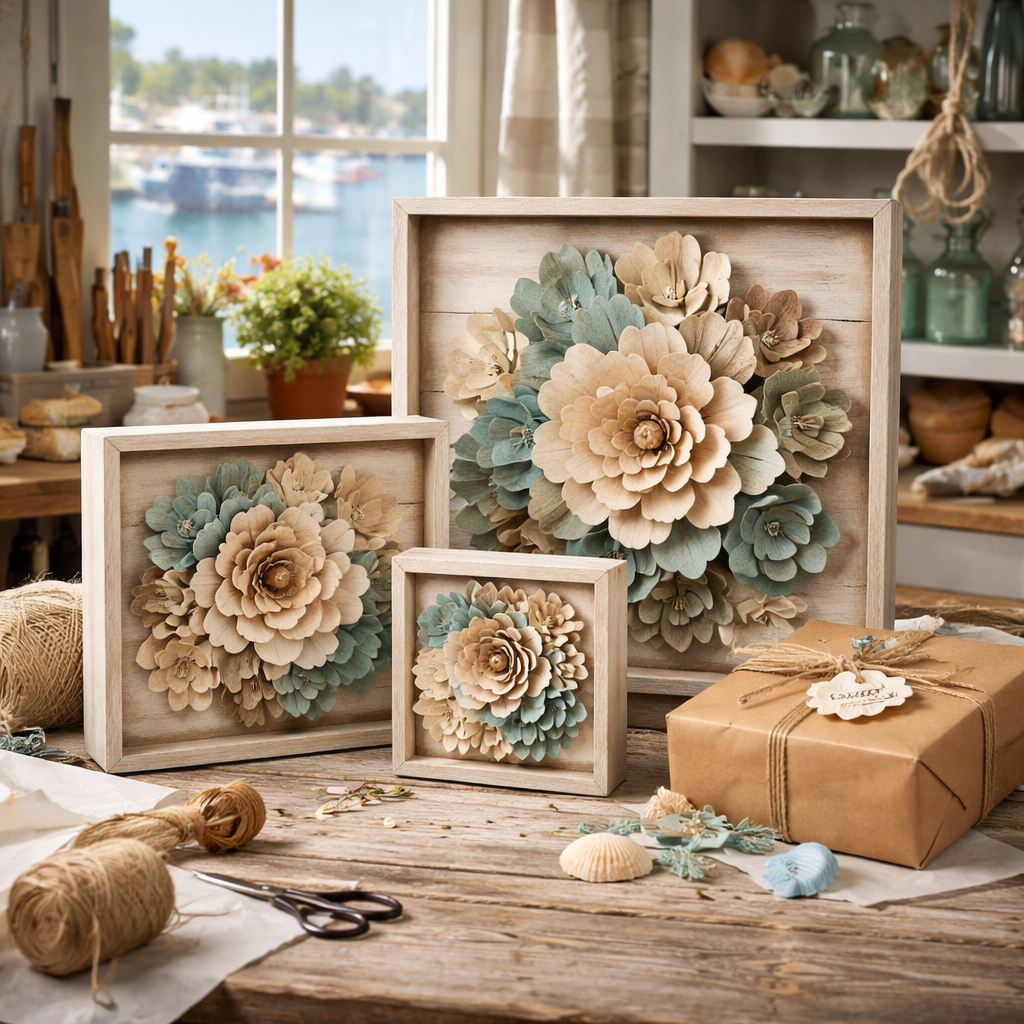
Step 4: Designing Gift‑Ready Arrangements
Let me be honest: gift-ready arrangements are where the craft meets the occasion. You want something personal, not promo‑y. Here’s a simple, practical guide you can actually use.
First, think in layers. A small, a medium, and a large wood flower art piece creates a natural vignette on a mantle or shelf. Pair with neutral packaging: craft paper, brown twine, a seed-paper tag. The pine texture and hand-painted gradients make a gift that lasts far longer than fresh blooms.
At Atlantic Wood N Wares, we design pieces that are easy to gift. You can assemble a ready-to-hang display without disturbing the work itself. If you’re shopping for a Dartmouth home or coastal‑lifestyle enthusiast, a cohesive set reads as thoughtful.
Next, consider customization. If you know the recipient’s color story—seafoam greens, dune sands, or stormy blues—hand-paint each petal with a gradient that echoes that palette. And if you’re giving as a housewarming or closing gift, a small note with the piece’s story goes a long way.
Display matters too. Hang at eye level in a high‑traffic spot, or prop on a shelf with indirect lighting to catch the petal edges. The warm, matte Aura finish we use dries hard and resists humidity, so gift‑ready doesn’t mean fragile.
Want a concrete example? Imagine a set of three wood flower art pieces arranged above a fireplace mantel in a Dartmouth cottage. The color tones echo sea glass and sandy shore, tying the room together and sparking compliments from guests. For more ideas on personalized options, check out Kits and Crates Wooden Birth Month Flower as an example of how a single piece can become a meaningful gift.
Display: Finally, packaging can be as simple or as elevated as you like. A breathable cotton wrap, a kraft box, or a small brass tag with a handwritten note keeps the focus on the wood itself.
If you want to keep it seasonal, our Ready-to-Display wooden flower décor is designed to arrive gift‑ready, with no extra fuss.
Three quick rules to remember: keep color cohesion, respect scale, and let the grain speak. The wood's texture tells a story, and when you tie that into a gift presentation, the recipient feels seen.
So, what's next? Gather two or three wood flower art pieces, pick a palette that echoes a room, and add a simple card with a note about the maker and the place—Nova Scotia, of course. You’ll have a thoughtful, durable gift ready for birthdays, housewarmings, or holidays. We’re here to help you today.
Step 5: Caring for and Maintaining Wood Flower Art
Okay, you’ve carved, painted, and hung your wood flower art—now comes the part most people skip: keeping it looking fresh year after year.
First thing’s first: wood is alive in a quiet way. It still breathes, swells a bit with humidity, and loves a gentle touch. Treat it like a treasured keepsake, not a plastic replica, and the colours will stay vivid without a fuss.
Everyday dusting
Grab a soft, dry microfiber cloth and give each petal a quick swipe. You’ll hear the faint whisper of the grain—that’s the wood saying “thanks”. If you’re cleaning a whole wall display, work from the top down so any dust that falls lands on an area you haven’t touched yet.
Don’t reach for a feather duster or a stiff brush; those can scratch the paint’s protective layer.
Spot cleaning
Sometimes a kitchen splash or a curious child’s finger leaves a faint spot. Lightly dampen a cloth with lukewarm water—no soap, no chemicals. Wring it out until it’s barely moist, then pat the blemish. The low‑VOC Benjamin Moore Aura finish we use is water‑resistant, so a quick dab won’t lift the colour.
If the mark persists, add a drop of mild dish soap to the cloth. Test on a hidden corner first, just to be safe.
For more detailed guidance on handling porous wood flowers, see Sola’s expert care tips.
Humidity & warping prevention
Wood loves a stable environment. In coastal Nova Scotia, the air can swing from sea‑spray mist to indoor heating dry. Keep the relative humidity in the 40‑55 % range and your flower art will stay flat. A quick way to monitor is a cheap thermo‑hygrometer you can place on a shelf nearby.
For a deeper dive on why moisture matters, check out Delmhorst’s guide to preventing wood warping. It explains how wood absorbs or releases moisture and why consistent storage conditions matter.
Seasonal care
When winter winds bring a drier indoor climate, give your pieces an extra dusting and consider a brief “air‑out” on a low‑heat radiator for 10 minutes—just enough to let the wood settle without overheating.
In summer, a light mist from a humidifier can actually help the wood stay balanced, especially if your home runs air‑conditioning that dries the air out.
Travel & storage
Planning to move the art to a new home or a holiday cabin? Keep it upright, never lay it flat, and wrap it in a breathable cotton sheet or a kraft box with a bit of padding. Avoid plastic bags; they trap moisture and invite mould.
And if you ever need to store it long‑term, store it in a climate‑controlled space—think a closet with a dehumidifier rather than an attic that bakes in summer heat.
Quick maintenance checklist
- Dust weekly with a dry microfiber cloth.
- Spot‑clean with a barely‑wet cloth; add mild soap only if needed.
- Check humidity; aim for 40‑55 %.
- Inspect for warping after any major temperature shift.
- Wrap securely for moves; keep upright.
- Refresh the seal every 2‑3 years with a thin wipe‑on Aura coat (optional).
One last thought: caring for wood flower art is almost meditative. You’re not just preserving décor—you’re honoring the grain, the paint, and the story of the hands that carved it. And because you’re using sustainable pine and low‑impact finishes, that story stays green for generations.
So, ready to give your wood flower art the love it deserves? A few minutes a month keeps it looking like the day you first hung it—no wilt, no fuss.
Step 6: Showcasing Your Creations in Maritime Décor
Imagine you’ve just hung a fresh piece of wood flower art above your kitchen hearth. The soft, hand‑painted petals catch the late‑afternoon light and suddenly the whole room feels like a quiet harbour. That moment of “wow” is exactly what we’re aiming for when you place your creations in a maritime setting.
Pick the right anchor point
First, choose a wall that already tells a sea‑side story – think reclaimed shiplap, a weathered boat‑lodge door, or a slate accent wall in the entryway. The grain of the wood flower art will echo the grain of the surrounding timber, creating a visual echo that feels intentional.
Does the space have a natural focal point, like a large window looking out over the water? Hang the piece at eye level (about 57‑inches from the floor) so the colour palette can dance with the changing daylight. If you’re unsure, hold the piece up with a piece of painter’s tape and step back – does it feel balanced?
Layer with complementary maritime accents
Pair your wood flower art with a few curated accessories: a drift‑wood frame, a brass lighthouse figurine, or a woven sea‑grass rug. The key is to keep the palette cohesive – soft sea‑foam greens, muted sand tones, and the occasional splash of coral. Too many bold colours will drown the subtle elegance of the handcrafted blooms.
Real‑world example: a client in Halifax added a set of three medium‑sized wood flower pieces above their mantel, then placed a vintage oar and a pair of glass bottles filled with sand. The result was a conversation‑starter that reminded guests of a summer day on the Bay of Fundy.
Use lighting to highlight texture
Maritime décor loves natural light, but a well‑placed lamp can make the painted petals glow like sunrise on the water. A warm LED wall sconce positioned 6‑12 inches above the piece adds a soft halo without harsh glare. If the room gets plenty of daylight, a sheer linen curtain can diffuse the sun and prevent glare.
Tip from our workshop: a single directional spotlight with a matte diffuser brings out the subtle brushstrokes in the Aura finish while keeping the overall ambience calm.
Display ideas for different rooms
Living room: Create a gallery wall with two to three wood flower art pieces of varying sizes. Mix in framed nautical maps or vintage postcards for depth.
Dining area: A single large bloom centered above the table sets a serene backdrop for meals. Pair with a reclaimed‑wood sideboard and a set of sea‑glass candle holders for a cohesive look.
Bathroom: Because the Aura paint is water‑resistant, a small piece can sit on a vanity shelf near a window. Add a small potted succulents for a fresh, spa‑like vibe.
Seasonal swaps without the hassle
One of the joys of wood flower art is its durability. When you want to freshen the look for a summer beach party, simply add a few sprigs of dried sea‑weed or a handful of shells to the base. In winter, swap the lighter hues for deeper navy or charcoal tones. The underlying wood stays the same, so you’re not buying new décor – you’re just styling it differently.
Here’s a quick seasonal checklist:
- Spring: pastel blues, soft pinks, add a small drift‑wood branch.
- Summer: bright turquoise, lime accents – think of the Caribbean‑vibe wood bouquet from Sola’s island‑inspired wood bouquet for colour inspiration.
- Fall: muted sea‑foam, amber, incorporate a small piece of reclaimed fishing net.
- Winter: deep navy, charcoal, add a brass compass or a candle in a glass lantern.
Expert tip: keep the marine vibe subtle
It’s tempting to go full‑on “nautical” with anchors, ropes, and ship wheels, but the best‑looking spaces let the wood flower art lead the story. Use maritime elements as supporting characters, not the main act.
Finally, step back and ask yourself: does the arrangement feel like a calm tide or a stormy sea? If it feels balanced, you’ve nailed the maritime showcase. If not, tweak one element at a time – a new lamp, a different frame, or a fresh colour accent – and watch the room transform.
FAQ
\nWhat exactly is wood flower art, and why should I consider it for my Nova Scotia home?
\nWood flower art is handcrafted, hand-carved blooms made from Canadian pine and other sustainable woods. Each petal is carved, then painted with low-VOC finishes and sealed for durability. The result is a wall piece that stays vibrant year after year, even in coastal humidity.
\nIn our Dartmouth workshop, we obsess over grain, shade, and texture so the petals read as alive rather than flat. It’s a timeless, tactile piece that suits the Maritime vibe without the upkeep of real flowers.
\nHow do I decide on size and arrangement?
\nStart by measuring the wall and thinking about how much focus you want. A single bold bloom makes a statement; a trio creates a gallery feel. Hang at eye level—roughly 57 inches from the floor, adjusted for furniture height. Our collections include small, medium, and large pieces designed to work alone or together for a natural rhythm across the room.
\nWhat finishes hold up in Atlantic humidity, and how are they applied?
\nWe favor low-VOC, water-based paints like Benjamin Moore Aura. They stay color-stable and resist fading in coastal air. The process is simple: a light base coat, then subtle hand-painted gradients to keep the grain visible, followed by a thin Aura seal.
\nThe result is color that breathes with the room and a surface that’s easy to wipe clean if splashes happen near the harbor view.
\nIs wood flower art a good gift, and how should I present it?
\nYes—it's a thoughtful, lasting gift. A set of pieces in varying sizes makes a curated display that endures beyond seasonal trends. We gift-wrap with simple, rustic packaging and include a note about the maker and Nova Scotia roots. Gift-ready by design, these pieces hang easily and travel well for moves or visits.
\nHow should I care for and maintain wood flower art over the years?
\nDust weekly with a soft microfiber cloth. For spots, a barely damp cloth works; avoid harsh cleaners. Keep humidity steady around 40-55% to prevent warping. If you move pieces, wrap gently and store upright. Occasionally refreshing the Aura seal keeps colors vibrant without changing the look.
\nDo you offer customization or made-to-order options, and what’s the turnaround?
\nYes. We tailor palettes to your space—seafoam greens, dune sands, or stormy blues—with hand-painted gradients that respect the carved depth. Turnaround for custom work is typically 2-4 weeks, depending on complexity and demand. We confirm timing upfront and can assemble a matched trio or a single showpiece that fits your room and budget.
Conclusion
Let’s take a moment to breathe and look back at what we’ve discovered together. You’ve seen how sustainable pine, hand‑carving, and low‑VOC paint turn a simple block of wood into a piece that feels like a quiet harbour on your wall.
If you’re wondering whether all those steps matter, think about the last time a piece of décor sparked a smile in a guest or made your own kitchen feel a little more like home.
The truth is, wood flower art isn’t just decoration; it’s a tiny, lasting reminder of the craftsmanship that thrives in Dartmouth’s workshops.
So, what’s the next step for you? Grab a piece that matches your colour story, hang it at eye level, and give it a quick weekly dusting – that’s really all it takes to keep the charm alive.
And if you’re ready to treat a loved one or celebrate a new‑home milestone, our ready‑to‑display collections make gifting effortless, with no assembly required.
Remember, a little care now saves you a lot of worry later, and every swipe of a microfiber cloth is a quiet nod to the hands that carved those petals.
Ready to bring that serene, coastal feel into your space? Explore our handcrafted wood flower art and let the story continue on your walls.


