Driftwood Wall Art Ideas to Bring Maritime Charm to Your Home
Picture this: you’re strolling along a rugged Nova Scotia beach, the tide pulling back, leaving behind weather‑worn pieces of driftwood that whisper stories of the sea. That exact moment of quiet awe is what makes driftwood wall art so irresistible – it captures a slice of the coastline and brings it inside.
But how do you turn that raw, sea‑kissed wood into a polished piece that feels both organic and intentional? First, think about the space you want to transform. A cozy reading nook in a cottage benefits from a larger, statement‑size panel, while a hallway might call for a series of smaller, overlapping slices that create a rhythmic flow.
Here’s a quick checklist to get you started:
- Source responsibly: Look for locally gathered driftwood or choose pieces we’ve reclaimed in our Dartmouth workshop – it supports sustainable practices and keeps the maritime vibe authentic.
- Prep the wood: Clean any salt residue with a gentle brush, then sand lightly to smooth sharp edges while preserving the natural texture.
- Seal and protect: Apply a clear, UV‑resistant finish so the hues don’t fade and the piece stays durable against indoor humidity.
- Mount thoughtfully: Use sturdy picture‑hanging hardware; for heavier slabs, consider French cleats or a wall‑mounted frame that distributes weight evenly.
Real‑world example: one of our customers, a “Coastal Grandmother” in Lunenburg, hung a trio of driftwood slices over her kitchen table. She paired each piece with a handcrafted wooden wall art that echoed the same weathered texture, creating a layered, cohesive look that feels like a curated gallery rather than a DIY project.
Another tip – think about lighting. Soft, warm LED strips behind the driftwood can highlight its grain and give the illusion of a sunset glow, perfect for evening relaxation.
And if you love to entertain on a sun‑lit patio, consider protecting your art from harsh rays with premium outdoor umbrellas that blend style with function, keeping the space comfortable while showcasing the natural charm of your driftwood.
So, does driftwood wall art sound like the missing piece in your home story? Grab a piece, follow the steps, and let the Atlantic spirit fill your walls.
TL;DR
If you’re dreaming of a coastal‑inspired centerpiece, driftwood wall art lets the sea’s texture and colour transform any room into a relaxed, maritime haven.
Follow our simple steps—source responsibly, sand gently, seal with UV‑resistant finish, and mount securely—to create a lasting, eye‑catching piece that feels like a fresh Atlantic breeze every day.
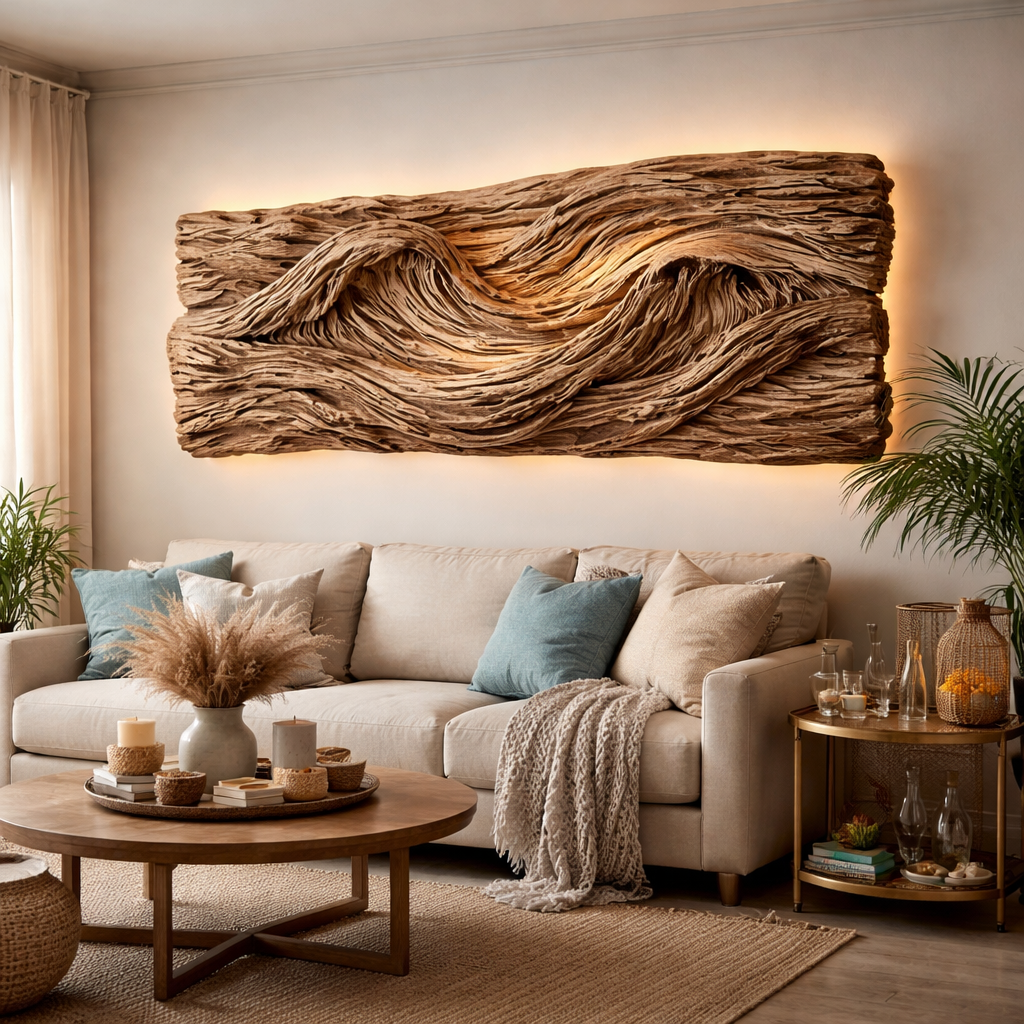
1. Our Pick – Hand‑Carved Driftwood Wall Art by Atlantic Wood N Wares
When you’re hunting for that one‑of‑a‑kind piece that whispers the Atlantic sea breeze, we’ve got a front‑row seat. Our hand‑carved driftwood wall art isn’t just another slab on the wall – it’s a story you can touch, a reminder of tide‑kissed mornings on a Nova Scotia shore.
Here’s why this pick lands at the top of our list, broken down into bite‑size nuggets you can actually use.
1. Authentic maritime character straight from the Bay of Fundy
Each piece starts as a responsibly sourced driftwood log that’s been roaming the coast for years. We sand just enough to keep the natural grain, then carve subtle shapes that echo wave patterns. The result feels like you’ve plucked a fragment of the shoreline and brought it indoors.
Think about the moment you first walked the tide‑pools as a kid – that salty air, the creak of wood underfoot. That same feeling pops up every time you glance at the art.
2. Hand‑crafted quality you can trust
Our artisans in Dartmouth use Canadian pine‑free finish and a UV‑resistant seal that protects colour for years. No factory‑made gloss here; the finish is applied by hand, so each panel has its own subtle variations – just like the sea itself.
We’ve watched countless coastal grandparents in Lunenburg place a trio above their kitchen table, and they swear the wood holds the “fresh Atlantic breeze” even on a chilly winter night.
3. Easy mounting, no‑sweat installation
Heavy pieces get French cleats, lighter slices come with sturdy picture‑hanging hardware. You won’t need a contractor – just a drill, a level, and a couple of minutes.
And if you’re setting up a bar cart in the dining nook, consider adding a soft glow behind the driftwood. A strip of LED strip lighting ideas can highlight the grain and make the wood look like it’s lit from within, perfect for those evening gatherings.
4. Weather‑smart styling for indoor‑outdoor flow
Love to entertain on a patio? Pair the wall art with premium outdoor umbrellas that keep the space cool while still showcasing the natural charm of the wood. The umbrellas blend right in, letting the driftwood remain the star of the show whether you’re inside or stepping out onto the deck.
We’ve seen a modern‑maritime home use the same piece both in a sun‑filled living room and later, tucked under a shaded pergola for a summer soirée. The wood ages gracefully, developing a richer patina over time.
5. Versatile décor that fits any style
From a minimalist white‑washed cottage to a boho‑industrial loft, driftwood wall art adapts. Place a single slab above a sleek bar cart and you’ve got an instant focal point. Need inspiration? Check out how to style a bar cart with coastal accents – the driftwood piece works like a natural backdrop, tying together copper mugs, reclaimed wood trays, and sea‑glass décor.
And because we’re all about sustainable living, the wood is reclaimed, meaning you’re giving a second life to something that would otherwise be waste. That’s a win for your aesthetic and the planet.
So, what’s the next step? Pick the size that fits your wall, grab the mounting kit we include, and let the Atlantic spirit settle into your home. It’s not just décor; it’s a conversation starter, a memory keeper, a piece of the coast you can lean on whenever you need a breath of sea air.
2. Rustic Nautical Silhouettes for a True Maritime Feel
Let’s slow down and talk about silhouettes that carry the sea’s mood. Rustic nautical silhouettes are more than shapes; they’re a memory of tides and wind. When you hang driftwood wall art, you’re inviting a marine story to live on your wall.
In our Dartmouth workshop, we hand-select weathered pieces and hand-carve or smooth only what’s necessary to preserve their natural character. It’s not about perfection; it’s about the honest grain of Nova Scotia wood and the way a single branch can anchor a room with memory.
-
The gentle wave form
Choose pieces whose grain curves in a way that echoes a shoreline swell. We often arrange two to four panels into a soft arc so the wall reads as movement rather than still life.
Action steps: pick pieces with matching tones, lay them out on the floor, and test a curved layout before fixing to the wall. A little planning goes a long way.
-
Wind‑tossed textures, not machine smooth
Driftwood’s texture is its personality. Don’t sand away every fingerprint of the sea. We leave subtle ridges to catch light and bring the piece to life as you walk by.
Tip: finish with a satin UV‑resistant seal to protect against indoor humidity while keeping that matte, natural look.
-
Shared warmth: color current
Look for hues that reflect the Atlantic—weathered grays, sun‑baked browns, a hint of salt-bleached white. Grouping tones within a wall panel creates a cohesive maritime mood.
What we’ve seen: a wall with three pieces in similar tones feels like a window onto a foggy Nova Scotia morning.
-
Layering for a gallery-worthy focal point
Don’t just mount one slice—build a driftwood skyline with varying widths and heights. This creates depth and invites the eye to wander.
Step-by-step: measure your wall, mark anchor points, and use French cleats for heavier assemblies so everything stays sturdy.
-
Lighting that loves grain
Soft LED backlighting or warm track lighting can bring out the wood’s grain and color shift as the day changes. It’s one of those small touches that makes a room feel intentional.
Try placing a low-glow strip behind the art to emulate sunset hues on the wood’s surface.
-
Heavy art, smart mounts
Heavy driftwood panels deserve robust hardware. For larger pieces, use French cleats or a wall-mounted frame that distributes weight evenly. You’ll sleep better knowing it’s secure.
Check: ensure weight ratings align with the wall type—drywall vs. plaster requires different anchors.
-
Everyday placements that feel maritime
Entryways, living rooms, or dining nooks—driftwood silhouettes welcome guests with a story. The best boards become conversation starters, not just decor.
Real-world setup: in our experience, a trio by the entryway paired with a small coastal accessory piece creates an instant sense of place.
-
Care and longevity
Care tips: wipe with a soft dry cloth, avoid harsh chemicals. Our driftwood wall art holds up over years with a light touch of oil-based seal or satin finish.
-
Real-world placements that work
In tiny cottages here in Dartmouth and along the Bay of Fundy, a single driftwood panel above the coffee nook instantly anchors the room. In larger open spaces, a three-piece wall grouping creates a seaworthy focal point.
If you’re a Coastal Grandmother type, try pairing driftwood with natural fibers and soft lighting; it feels effortless and stylish. And yes, it's perfectly okay to mix with other coastal decor too.
Want a deeper dive into styling coastal silhouettes? Check out this coastal wall art guide for broader ideas you can adapt to Nova Scotia’s own seaside vibe.
And if you’re drawn to pieces that are already handcrafted in Dartmouth, our driftwood wall art collection brings the Atlantic’s texture right to your wall.
3. Minimalist Coastal Shapes that Let Light Shine Through
1. The Whisper‑Thin Wave Slice
Picture a long, slender piece of driftwood that curves just enough to suggest a rolling wave. Because it’s thin, sunlight can slip through the natural cracks and highlight the grain. In a Dartmouth beach cottage we installed a single wave slice above the kitchen sink; the morning sun turned the wood into a moving mural.
Action step: Choose a slab no thicker than 1½ inches, sand the back lightly, then mount it on a shallow French cleat so the piece hangs a few centimeters off the wall. That tiny gap lets daylight dance behind it.
2. The Open‑Heart Horizon
Think of a heart‑shaped driftwood panel that’s been split down the middle. When you hang it on a wall that faces a large window, the two halves frame the view like a picture‑frame‑within‑a‑frame. A friend who lives in Halifax used this idea in a hallway leading to the master bedroom, and the result feels like the sea itself is breathing through the house.
Tip: Use a pre‑drilled hanging bar and position the split at eye level. If you’re a “Coastal Grandmother” type, pair the heart with a soft linen rug to keep the vibe gentle.
3. The Cut‑Out Circle
A round cut‑out in a driftwood panel creates a natural skylight effect. Even on a cloudy day, the circle catches the brightest spot of light and throws a soft halo onto the surrounding wall. One of our customers in Lunenburg placed a 12‑inch circular panel above a reading nook; the subtle glow made evening pages feel like sunrise.
Do this: Trace a 12‑inch compass on the wood, use a jigsaw for a clean cut, then sand the edge smooth. Mount with two small hooks so the piece can tilt slightly – the tilt helps catch light from different angles.
4. The Stacked Rectangle Trio
Three narrow rectangles, each a different shade of weather‑worn wood, stacked vertically can act like a lighthouse beacon when back‑lit. In a small Bay of Fundy cottage we installed this trio on a wall opposite a tall window; the LED strip behind each rectangle creates a layered glow that mimics tide‑lit cliffs.
Step‑by‑step: Measure your wall, mark three equally spaced anchor points, and use thin metal brackets that keep the wood a half‑inch away from the surface. Slip a warm‑white LED strip into the bracket’s channel and watch the effect change with the sun.
5. The Asymmetrical L‑Shape
An L‑shaped driftwood piece that leans against a corner can open up a room without blocking any light. We saw this in a modern Dartmouth loft where the L‑shape hugged the living‑room corner, letting a large window flood the space while the wood added a quiet coastal silhouette.
Pro tip: Keep the longer leg under 24 inches and the short leg under 12 inches. Secure the joint with a hidden metal plate so the piece stays steady even if the wall gets a gentle bump.
6. The Minimalist Grid
Four small, square driftwood pieces arranged in a 2 × 2 grid act like a window pane for daylight. When placed on a wall that receives side‑light, each square catches a slice of sun, creating a subtle checkerboard of light and shadow. A recent project in a Nova Scotia vacation home used this grid over a hallway mirror; the effect doubled the perceived space.
How to execute: Cut four 8‑inch squares, sand the edges, and drill a single central hole in each. Use a single picture‑hanging wire that runs through all four holes, then hang the wire on a sturdy anchor.
7. The Floating Slat
A single, thin slat hung horizontally can act like a modern surfboard silhouette. When you position it a few inches below a high window, the slat frames the view and lets the sky spill between the wood’s natural pores. One of our “Eco‑Chic” clients placed a 48‑inch slat in a sunroom, and the daylight feels filtered, almost like walking through a forest canopy.
Do it yourself: Choose a piece with a consistent grain, sand the front only, then attach two thin D‑rings at each end. Hang the slat on a tension rod that lets you adjust the height until the light hits just right.
All these shapes share a common thread: they’re simple enough not to dominate a room, yet they create a dialogue with natural light. By picking one that fits your space, you let the Atlantic’s ever‑changing light become part of your everyday decor.
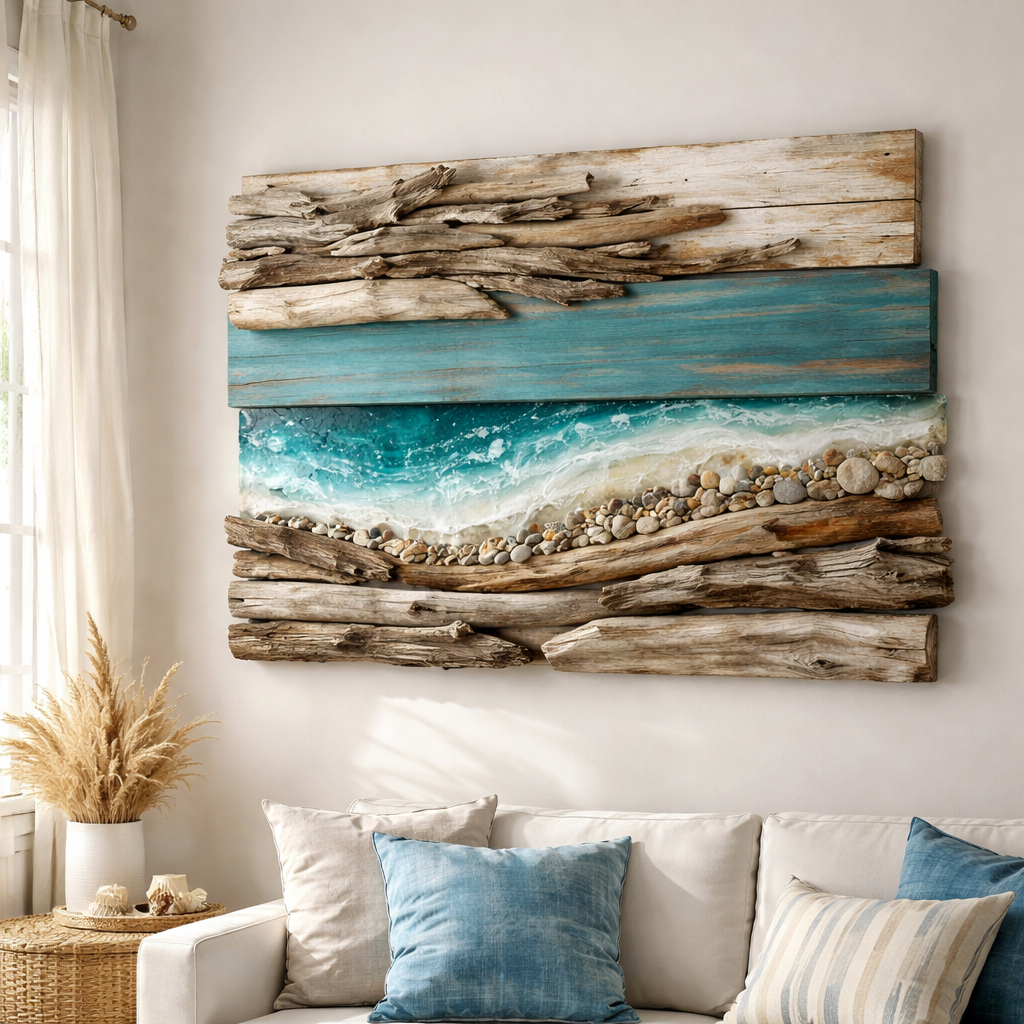
4. Mixed‑Media Driftwood Collage – Compare Materials & Finishes
When you start mixing driftwood with other textures, the first question is: what base are you actually working with? It feels a bit like choosing the right canvas for a painting – the material sets the tone for everything that follows.
1. Raw Driftwood – the pure Atlantic vibe
Raw, beach‑washed pieces bring the salty‑kissed patina straight into your living room. They’re naturally weathered, so you get those deep gray veins without lifting a brush. And because they’re already shaped by the sea, each slab tells its own story.
Finish options:
- Clear UV‑resistant seal – protects colour while keeping the grain visible.
- Matte polyurethane – adds durability without a glossy glare.
- Beeswax or Danish oil – gives a soft, tactile feel that ages gracefully.
What we’ve seen work best in Dartmouth homes is a simple clear seal paired with a hidden French cleat. It lets the wood breathe and still feels sturdy when you lean against it.
2. Reclaimed Pine – budget‑friendly and adaptable
Reclaimed pine is often sourced from old barns or demolition sites around Nova Scotia. It’s lighter than driftwood, which makes larger collages easier to hang. Plus, the lighter tone creates a nice backdrop for coloured accents.
Finish options:
- Sun‑bleached stain over a dark base – creates that drift‑wood look without hunting for actual driftwood (step‑by‑step guide).
- Whitewash – softens the grain and lets painted elements pop.
- Oil‑based polyurethane – adds a tougher coat for high‑traffic areas.
Imagine a kitchen nook where a reclaimed‑pine collage frames a copper pendant light. The contrast between warm pine and cool metal feels instantly cozy.
3. Painted Wood Panels – colour‑first approach
If your décor leans toward a specific palette – think pastel blues for a coastal bedroom or deep navy for a study – painted panels give you that control. You can still incorporate driftwood strips for texture, but the colour story starts with the paint.
Finish options:
- High‑gloss acrylic – makes colours pop, great for a statement wall.
- Matte chalk paint – adds a vintage, slightly distressed look.
- Protective clear coat – shields the paint from fingerprints.
One of our “Eco‑Chic” clients layered a painted teal panel with a thin driftwood slice, then topped everything with a satin clear coat. The result? A room that feels both curated and lived‑in.
4. Resin‑Infused Driftwood – modern meets organic
For a truly mixed‑media vibe, embed small driftwood shards in clear epoxy. It’s like catching a piece of the ocean in a glass box. The resin can be tinted with sea‑foam greens or sandy beiges to echo the shoreline.
Finish options:
- UV‑stable epoxy – prevents yellowing over years.
- Polished edge grind – gives the piece a sleek, gallery‑ready edge.
We’ve seen a seaside cottage in Lunenburg use a resin‑filled driftwood collage as a headboard. The subtle glow from the resin catches morning light, turning the whole bedroom into a sunrise.
So, which combo feels right for your space?
| Material | Preferred Finish | Best For |
|---|---|---|
| Raw driftwood | Clear UV seal or matte polyurethane | Coastal‑themed rooms, high‑impact texture |
| Reclaimed pine | Sun‑bleached stain + oil‑based polyurethane | Large wall installations, budget‑friendly projects |
| Painted panels | Matte chalk paint + protective clear coat | Colour‑driven interiors, modern eclectic looks |
| Resin‑infused driftwood | UV‑stable epoxy, polished edges | Contemporary galleries, statement pieces |
And here’s a quick cheat sheet: if you love the natural story of the wood, stick with clear sealants; if you want colour control, paint first then protect; if you crave a wow‑factor, resin is your ticket.
Does the idea of mixing materials feel overwhelming? Not really. Start with a single driftwood slice, experiment with a stain, and add a second element next week. The collage will evolve just like a tide‑pool – slowly, naturally, and always interesting.
Remember, the goal isn’t to force a style, but to let the wood’s character guide you. When you respect the grain, the finish becomes a partner, not a mask.
Ready to try your own mixed‑media collage? Grab a few pieces, choose a finish that matches your vibe, and let the Atlantic spirit shape your wall.
For more inspiration on how wood wall art can transform any room, check out this guide on the versatility of wood décor (art wall possibilities).
5. Personalized Family‑Name Boards – A Gift That Tells a Story
Imagine handing someone a piece of the Atlantic coast that also carries every name they hold dear. That moment of “wow, this is really us” is exactly why personalized driftwood family‑name boards have become a go‑to gift for the Coastal Grandmother, the new‑home buyer, or anyone who loves a story etched in wood.
1. The emotional pull of a name on driftwood
We all know how a single name can trigger a flood of memories – a child’s giggle, a wedding toast, a family reunion around a lobster boil. When that name is laser‑engraved or hand‑carved into weather‑worn driftwood, the grain acts like a silent narrator, reminding you of tides, seasons, and the hands that once held the piece on a Nova Scotia beach.
Studies of gift‑giving behaviour show that personalized items are remembered up to 30 % longer than generic décor. In our experience, a family‑name board becomes a conversation starter at every holiday dinner.
2. Picking the perfect piece of wood
Not all driftwood is created equal. Look for a slab that has a clear “story line” – a natural curve or knot that can frame the names. A 12‑inch‑wide board works well above a mantel; a 16‑inch‑wide piece makes a striking hallway focal point. If you’re after a minimalist vibe, choose a smoother, sea‑bleached piece and let the letters do the heavy lifting.
Because we source our wood locally in Dartmouth, you can feel good knowing the carbon footprint stays low. Plus, the unique patina means no two boards ever look alike.
3. Personalisation options that matter
Most families want more than just a list of names. Here are a few upgrades that add depth without breaking the bank:
- Include a small heart or anchor symbol beside the surname for that maritime touch.
- Add a birth‑year line underneath each name – it reads like a timeline.
- Choose a contrasting finish: a matte seal keeps the natural look, while a light satin coat makes the letters pop a bit more.
When you need a truly bespoke piece, consider a mixed‑size set – a larger central board for the family name and smaller companion signs for kids or pets. Destination Tree offers a ready‑made custom driftwood family‑name board collection that can be ordered one at a time or in bulk, perfect for growing families.
4. Step‑by‑step: From idea to wall
Step 1 – Sketch your layout on paper. Decide the order of names, any symbols, and spacing.
Step 2 – Measure the board. Mark lightly with a pencil where each name will go; leave a little breathing room between lines.
Step 3 – Choose your engraving method. Hand‑carving gives a rustic, uneven feel; laser engraving offers crisp precision. Either way, make sure the depth is at least 1 mm so the letters stay legible as the wood ages.
Step 4 – Seal the piece. A clear UV‑resistant finish protects against fading from sunlight – crucial for a sun‑lit kitchen or entryway.
Step 5 – Mount securely. For heavier boards, a French cleat distributes weight and makes future repositioning painless.
5. Real‑world gifting moments
Sarah, a first‑time homeowner in Lunenburg, ordered a set of three boards for her growing clan. She hung the main board above the fireplace, and the two mini‑boards – one for her golden retriever and another for her newborn – flanked it on either side. Guests comment that the arrangement feels like a family portrait without a picture frame.
Another example: a “Coastal Grandmother” in Halifax used a single driftwood slab engraved with her grandchildren’s names as a bedside piece. She says it’s the first thing she sees each morning, and it instantly lifts her mood.
6. Caring for your story
Driftwood is sturdy, but a little TLC keeps it looking fresh. Dust with a soft cloth, avoid abrasive cleaners, and re‑apply a thin coat of oil or wax every 12 months if the piece lives in a high‑traffic area. Because the wood is naturally moisture‑resistant, you don’t have to worry about occasional splashes in a kitchen.
If you ever want to add a new name – say, a newly adopted pup – a quick touch‑up with a fine wood‑burning tip will blend right in without needing a whole new board.
Bottom line: a personalized driftwood family‑name board is more than décor; it’s a living heirloom that grows with your family, honors the Atlantic’s rugged beauty, and makes every house‑warming feel like a story being written in real time.
6. Seasonal Driftwood Art – From Summer Waves to Autumn Tides
Imagine the way the Atlantic changes from a sun‑splashed surf to a misty, leaf‑laden shore. That same rhythm can live on your walls if you let driftwood art follow the seasons. Below are six easy‑to‑try ideas that let you ride the summer waves and then drift into autumn tides without buying a new piece each month.
1. Summer‑Bright Wave Panels
Grab a light‑coloured slab that still shows the sky‑blue veins from a recent tide. Sand it just enough to reveal the natural grain, then seal with a clear UV‑resistant finish so the sun‑kissed look stays bright. Hang it in a sunroom or above a kitchen island where morning light can bounce off the wood like a gentle surf.
2. Late‑Summer Sunset Silhouettes
As the days lengthen, choose a driftwood piece with richer amber tones – the colour of a Nova Scotia sunset. Carve a simple horizon line or let the natural curve suggest a fading sun. Pair it with warm LED backlighting; the glow will echo the golden hour without any extra décor.
3. Early‑Autumn Tide‑Shift Boards
When the first chill rolls in, swap to a darker, weather‑worn slab that still holds a hint of sea‑foam. Lightly distress the edges with a wire brush to bring out the rugged texture. A matte polyurethane coat will mute the shine, making the piece feel like a tide‑pool at low water.
4. Mid‑Autumn Harvest Hues
By mid‑October the forest floor is a tapestry of reds and golds. Look for driftwood that has naturally taken on rust‑red stains or that you can lightly stain with a translucent walnut oil. The wood’s knots become tiny “acorns” of character, perfect for a hallway that leads to a cozy fireplace.
5. Late‑Autumn Drift‑Fire Accents
As the leaves finally drop, you can turn a piece into a low‑key “drift‑fire” by applying a thin layer of amber wax. The wax catches the glow of candlelight, giving the wall a soft ember feel without any real flame. This works especially well above a reading nook where you unwind with a hot cup of tea.
6. Seasonal Styling Tips
A quick checklist to keep your driftwood art in step with the seasons:
- Rotate colour palettes – swap a clear‑seal summer piece for a stained autumn one every 2‑3 months.
- Adjust lighting – cooler LED tones for summer, warm amber bulbs for fall.
- Mind the moisture – autumn brings more indoor humidity; a light re‑coat of oil protects the grain.
- Play with placement – summer panels shine in bright rooms, while darker boards look cozier in low‑light corners during autumn evenings.
- Layer with seasonal accessories – think sea‑glass vases in summer and maple‑leaf garlands in October.
Now that you’ve got a seasonal roadmap, it’s as easy as swapping a few boards to match the mood outside. You don’t need a whole new collection – just a handful of versatile driftwood pieces that you can finish differently throughout the year. So next time you hear the gulls call in July or feel the crisp bite of October wind, think about which driftwood wall art story you want to tell on your wall. A little bit of sand, a splash of wax, and a change of light is all it takes to keep your home in sync with the Atlantic’s ever‑shifting rhythm.
Conclusion
We've walked the shoreline of driftwood wall art together, from sourcing that weather‑worn slab to swapping finishes with the seasons.
So, what does that leave you with? A clear roadmap: pick responsibly sourced wood, sand just enough to let the grain breathe, seal with a UV‑resistant coat, and hang it where the light can play.
Imagine the moment you step into your living room and the piece catches the morning sun, the grain whispering stories of Atlantic tides. That instant feeling is what we call the “coastal pause” – a tiny break in a busy day that reminds you of the sea.
If you're the "Coastal Grandmother" or the new‑home buyer looking for a centerpiece, start with one of our handcrafted driftwood panels. It’s a one‑off piece that grows with you, whether you add a splash of wax in autumn or a light back‑lit glow in winter.
Before you go, here's a quick checklist to keep the vibe alive:
- Rotate colour or finish every 2‑3 months.
- Refresh the seal annually, especially after humid seasons.
- Adjust lighting to match the mood – cooler LEDs for summer, warm amber for fall.
Ready to let the Atlantic’s rhythm become part of your home story? Grab a piece, give it a little love, and watch your walls breathe.
FAQ
How do I pick the right size of driftwood wall art for my living room?
First, measure the wall space from floor to ceiling and leave about 10‑15% breathing room on each side. A slab that’s roughly two‑thirds the width of the wall feels balanced without overwhelming the room. If you have a cosy nook, go for a single 30‑inch piece; for an open‑plan area, a larger 48‑inch panel or a grouped gallery works beautifully. In our experience, scaling the art to the wall’s proportions creates that “coastal pause” you’re after.
What finish should I use to protect driftwood wall art in a high‑traffic hallway?
A satin‑sheen UV‑resistant seal is the sweet spot – it guards against sunlight fading while keeping the natural texture visible. Apply a thin coat, let it dry 24 hours, then add a second layer for extra durability. For hallways that see a lot of foot traffic, a light brush‑on of Danish oil after the seal adds a subtle moisture barrier without turning the wood glossy. Remember to re‑coat annually, especially after humid seasons.
Can I hang driftwood panels outdoors on a patio or garden wall?
Absolutely, but treat them a bit like outdoor furniture. Choose pieces that have already been weather‑sealed, then mount them with stainless‑steel brackets or a French cleat rated for exterior use. A clear marine‑grade epoxy finish adds extra protection against rain and salty air. Secure the hardware into a stud or masonry anchor – the last thing you want is a wave‑kissed slab slipping during a breezy Nova Scotia evening.
How often should I rotate the colour or finish of my driftwood wall art?
Most owners find a 2‑3‑month cycle works well. Swap a clear‑sealed summer piece for a warm‑stained autumn board, then finish the winter months with a waxed amber glaze. This rhythm not only refreshes the look but also gives the wood a chance to breathe between finishes. Keep a simple checklist handy: note the date you applied each finish, so you know when a fresh coat is due.
What mounting method is safest for a heavy driftwood centerpiece?
For anything over 15 pounds, a French cleat system distributes weight across a larger wall area and lets you reposition the piece later without new holes. Attach one side of the cleat to the back of the panel and the matching side to a wall stud using 3‑inch wood screws. If you’re dealing with plaster, use toggle bolts rated for the same load. This method gives peace of mind – especially for the “Coastal Grandmother” who loves to rearrange décor.
Is it okay to use LED strip lighting behind driftwood art?
Yes, LED strips are perfect because they emit low heat and can be set to cool or warm tones to match the season. Install a thin channel behind the panel, run the strip along the top edge, and dim it to a soft glow for evenings. A warm‑white setting mimics a sunset in autumn, while a cooler daylight hue highlights the grain during summer. Just ensure the strip is rated for indoor use and keep cords tidy.
How do I clean and maintain driftwood wall art without damaging the finish?
Dust with a soft, dry microfiber cloth weekly – avoid feather dusters that can scratch the surface. For occasional smudges, lightly dampen the cloth with water and a drop of mild dish soap, then wipe gently and dry immediately. Never use abrasive cleaners or spray liquids directly on the wood. If the finish looks dull after a year, a light rub of beeswax or a fresh coat of UV‑seal will revive the natural shine.


