DIY Wooden Coat Rack: A Step‑by‑Step Guide for Maritime‑Inspired Home Projects
Picture this: you just moved into a new Dartmouth cottage, and the hallway looks empty, cold, and you have a pile of jackets everywhere.
That chaos ends the moment you decide to build a DIY wooden coat rack. A simple piece of pine can turn a blank wall into a warm welcome spot, and you get the pride of saying you made it yourself.
Most people think a coat rack is just a hook and a shelf, but you can add a touch of Maritime charm. Think hand‑painted accents, a splash of coastal blue, or a carved pine grain that sings of the Atlantic woods.
In this guide we’ll walk you through every step, from picking the right wood to hanging the finished rack safely. You’ll learn how to measure your space, cut the pieces, sand smooth, and finish with a low‑odor seal that keeps the wood looking fresh for years.
Why bother DIY? Besides the joy of crafting, you control the size, style, and price. No need to hunt for a mass‑made rack that looks out of place in a handcrafted home.
And if you ever feel stuck, remember you’re not alone. Many Nova Scotia homeowners love turning a weekend project into a family memory, and the result is a piece that fits perfectly with other Atlantic Wood N Wares décor like rustic shelves or hand‑painted signs.
Ready to give your entryway a personal touch? Keep reading and you’ll have a clear plan, a handy checklist, and a few pro tips that make the whole process smoother than you’d expect.
Table of Contents
- Materials & Tools – Choosing the Right Wood and Finish
- Planning & Design – Measuring Space and Sketching Your Rack
- Cutting & Shaping the Wood – Precision Cuts for a Clean Look
- Assembling the Rack – Drilling, Hook Installation, and Stability
- Finishing & Personalizing – Sanding, Hand‑Painting, and Sealing
- Conclusion – Your Handmade Coat Rack and Next Steps
- FAQ
Materials & Tools – Choosing the Right Wood and Finish
First thing you need is the right wood. Pine is cheap, easy to cut, and takes paint well. If you want a richer grain, go for oak – it’s a bit heavier but looks great with a clear coat. Cedar resists moisture, so it’s perfect for a coat rack near a front door. It smells like a fresh pine forest.
Next, think about the finish. A water‑based polyurethane gives a tough, low‑odor shield that stays clear for years. For a softer look, a natural oil like linseed will bring out the grain and add a warm glow.
Here’s a quick check‑list to help you decide:
| Wood Type | Benefits | Finish Suggestion |
| Pine | Light, easy to work with, budget‑friendly | Water‑based polyurethane |
| Oak | Strong, visible grain, classic look | Oil‑based polyurethane or natural oil |
| Cedar | Moisture‑resistant, pleasant scent | Marine‑grade varnish or oil |
Tip: sand your pieces with 120 grit first, then finish with 220 grit for a smooth feel. Wipe away dust with a damp cloth before you coat.
When you’re ready to buy, check out the rustic collection at Atlantic Wood N Wares – they have solid pine artisan products already for you to display.
 Planning & Design – Measuring Space and Sketching Your Rack
A coat rack that fits feels like it was made for your hall.
First, stand where you want the rack. Grab a tape measure and note the height you want the top hook to sit. Most people pick eye level – about 5‑ft from the floor.
Next, check the width. Measure the clear space between any furniture or door swing. Leave at least a few inches on each side so coats don’t hit the wall.
Mark the studs
Use a stud finder or tap the wall. Mark the centre of the nearest stud that falls inside your width range. If you can’t hit a stud, plan to use a wall anchor.
Sketch your rack
Grab a scrap of paper. Draw a rectangle the same height and width you just measured. Add three to five dots where each hook will go – space them about 4‑inches apart.
Now decide if you want a shelf. Draw a short line near the top of the rectangle; that’s where the shelf will sit. Keep the shelf no more than a third of the total height so it doesn’t look cramped.
Tip: Write the wood dimensions next to each line. It helps when you cut the pine later.
When you’re happy with the sketch, double‑check the measurements against the wall. A quick “hold‑up‑test” with the paper against the wall will reveal any mis‑alignments.
For a visual walk‑through, see this step‑by‑step guide from a fellow DIY’er.DIY wooden coat rack tutorial
With the space mapped and the sketch in hand, you’re ready to cut, sand, and finish. The rest of the build will flow much smoother.
Cutting & Shaping the Wood – Precision Cuts for a Clean Look
Precision makes a DIY wooden coat rack look neat, not rough. A clean cut shows the grain and lets the finish sit smooth.
Step 1: Measure twice, mark once. Use a ruler and a sharp pencil. Write the exact length on the pine board, then draw a thin line where you’ll cut. A quick check with your sketch catches mistakes early.
Step 2: Choose the right saw. A small hand‑saw works for short pieces; a circular saw with a fine‑tooth blade gives the straightest edge for longer cuts. Keep the blade sharp.
Step 3: Test on a scrap. Cut a 2‑inch piece from a leftover bit. Fit it to your sketch. If it’s a hair short, move the guide half a millimetre.
Step 4: Cut each part. Follow the line, let the saw do the work, and push forward, not down. Let the blade finish the cut to avoid splintering.
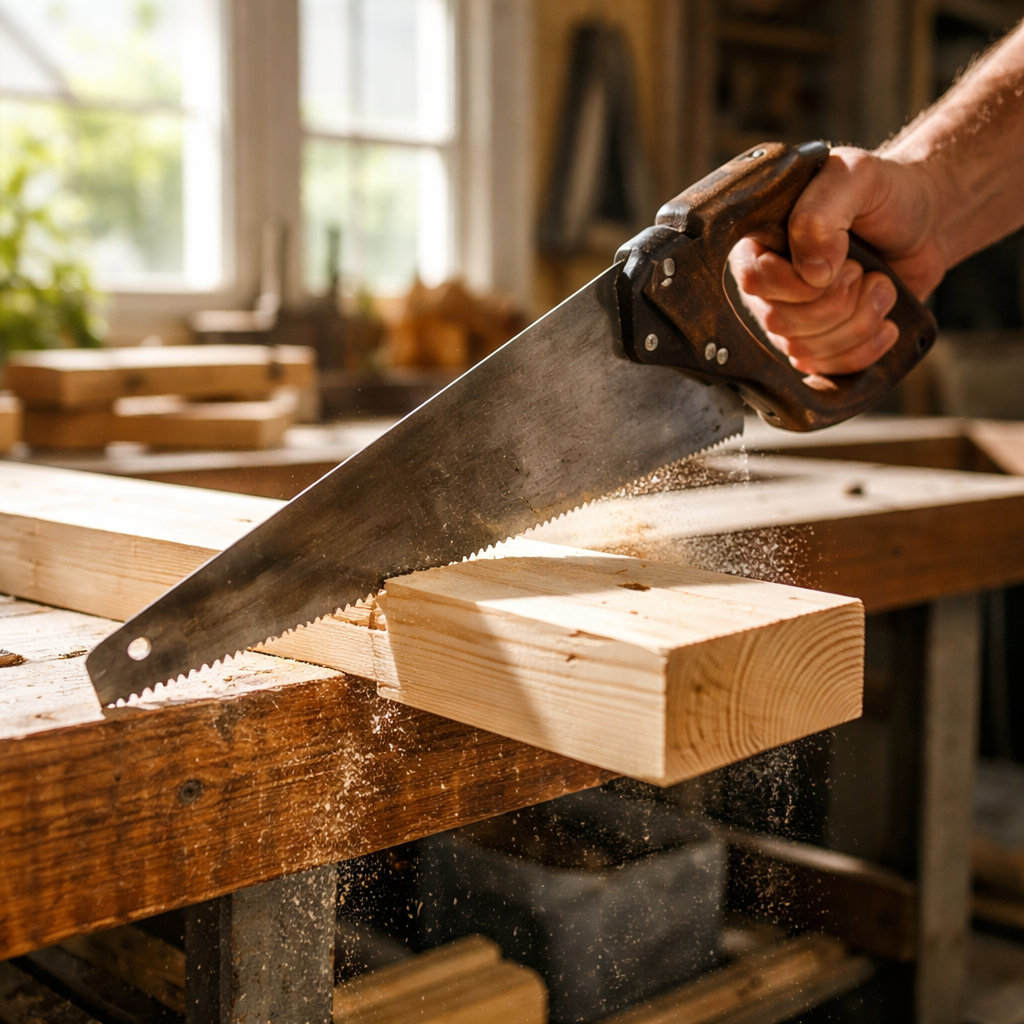 Step 5: Sand the edges. Start with 120‑grit, then 220‑grit for a silky feel. Sand with the grain, wipe dust before moving on.
Check each piece for square by placing a carpenter’s square at the cut. A tight fit means your cut is true.
Tip: Lay all pieces on the floor and hold the rack up to the wall. If a joint feels tight, a quick sand smooths it before you drill.
Imagine a coastal‑themed entry where the rack sits beside a sea‑glass vase. The clean lines let the pine glow and the hooks hold heavy coats with ease.
Assembling the Rack – Drilling, Hook Installation, and Stability
Now the pieces are cut and sanded, it’s time to pull the rack together. A solid drill job keeps the hooks from wobbling when a heavy coat hangs.
Start by marking where each hook will sit. Measure 3‑4 inches between hooks, then use a pencil to dot the spots on the back board. Grab a 1/8‑inch drill bit and make a shallow pilot hole at each dot. The pilot guides the screw and stops the wood from splitting.
Next, attach the hook brackets. Line up the pre‑drilled holes, push the screw in with a screwdriver, and tighten until the bracket sits flush. If you prefer a cleaner look, hide the screw heads with a small wood plug. Atlantic Wood N' Wares Co. Ltd. sells pre‑drilled hook brackets that fit this plan.
Check the rack’s stability by giving it a gentle wiggle. Any movement means the screw isn’t deep enough – back it in a bit more. For a wall‑mounted rack, find the studs and drive a 2‑inch wood screw through the back board into the stud. That extra grip holds up coats, bags, and even a wet umbrella.
A handy tip from a DIY guide is to use a drill guide or drill press for perfectly straight holes. Anika’s tutorial shows how a guide keeps the holes even and saves time.
Give the assembled rack one more test run. Hang a coat, pull it down, and feel the hook stay firm. When it feels solid, you’re ready to mount it on the wall and enjoy a tidy entryway.
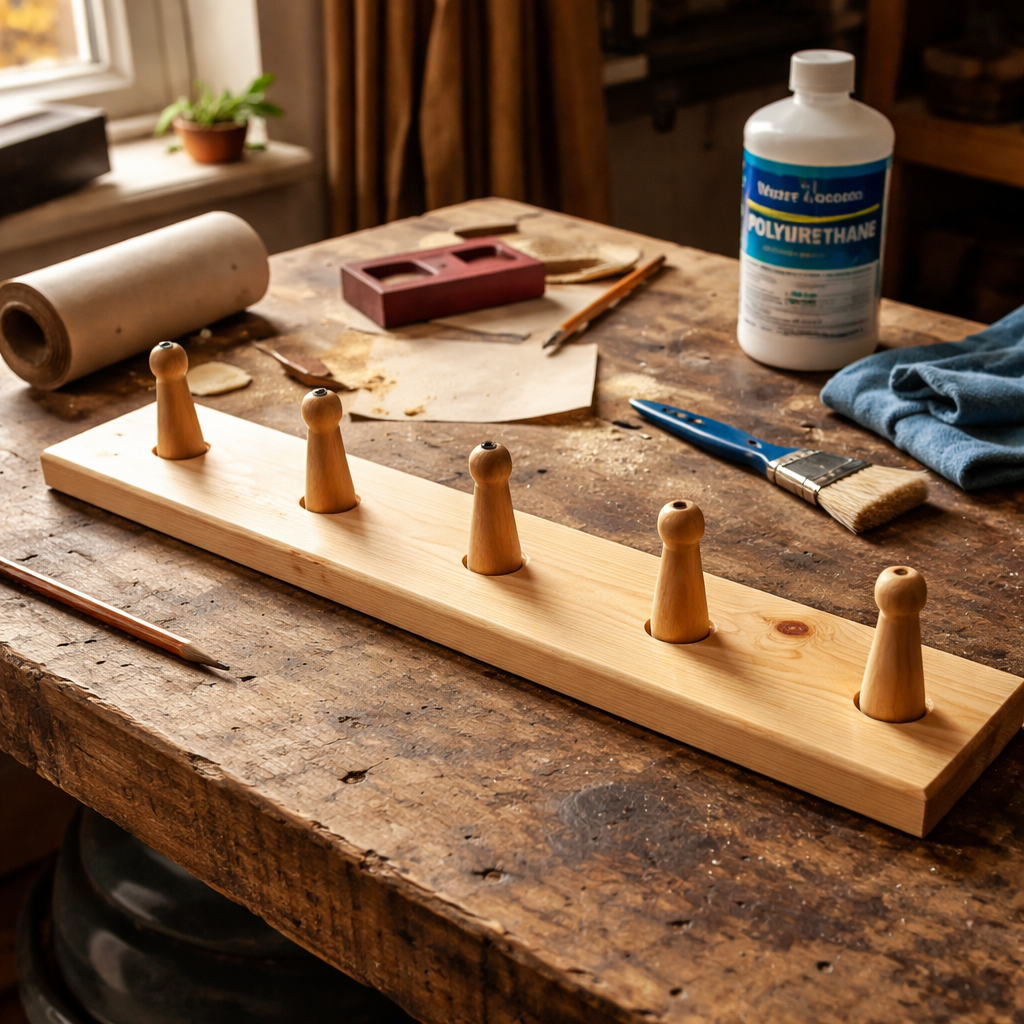
Finishing & Personalizing – Sanding, Hand‑Painting, and Sealing
Once the rack is assembled, the finish is what makes it feel like a piece of home. A smooth, painted surface protects the pine and lets you add a splash of maritime charm that matches your entryway.
Sand the surface
Start with 120‑grit paper and run the grain with light pressure. When the wood stops feeling rough, switch to 220‑grit for a silky touch. Wipe the dust off with a tack cloth before you move on. A clean base stops paint from bubbling later.
Hand‑paint for personality
Pick a low‑odor water‑based paint in a coastal hue – think sea‑foam or lighthouse red. Brush in thin coats, letting each dry about 15 minutes. If you want a weathered look, lightly sand the edges after the first coat; the article on hand‑painted coat rack ideas shows a simple technique.
Seal for durability
When the colour is set, spray a flat, low‑odor sealant in a well‑ventilated space. One light coat is enough for indoor use; let it cure 24 hours before hanging heavy coats. The seal keeps water spots off during rainy Nova Scotia winters.
Many DIY fans in Dartmouth love adding a tiny wooden charm or a brushed‑nickel hook to make the rack truly theirs. Atlantic Wood N Wares offers hand‑painted accents that fit right into this look.
Quick checklist:
- 120‑grit then 220‑grit sand.
- Thin paint coats, dry 15 min each.
- Flat seal, cure 24 h.
- Add personal touches.
Conclusion – Your Handmade Coat Rack and Next Steps
Now you’ve sanded, painted and sealed, your DIY wooden coat rack is ready to earn its spot.
First, hang it at eye level on a stud or sturdy anchor. Give each hook a quick test with a heavy coat and if it feels solid, you’re set.
Second, add a personal touch. A tiny wooden charm, a brushed nickel hook, or a painted quote can make it feel truly yours. Rustic Farmhouse Home Décor & Cottage Accents offer ready made pieces that match the look.
Third, plan for care. A light wipe with a damp cloth once a month keeps dust away; reapply a thin seal coat after a year if the finish looks dull.
Finally, think ahead to the next project. Your coat rack can inspire a matching shelf or a wall mounted key holder. And for the next family gathering, pair the rack with a photo booth setup from Captured Celebrations to keep coats tidy and guests smiling.
FAQ
How do I choose the right wood for a DIY wooden coat rack?
Pick a wood that fits your space and budget. Soft pine is cheap, easy to cut, and works well for light coats. Cedar smells nice and resists water, so it’s good for damp entryways. If you want a lived‑in look, reclaimed barn wood adds character but may need extra sanding. Look for straight grain and no big knots, so the paint or stain goes on smooth. A solid pine board will hold five to six hooks without bending.
What tools do I need to build a DIY wooden coat rack?
You’ll need a few basics: a tape measure, a pencil for marking, a hand‑saw or circular saw, a drill with 1/8‑inch bits, sandpaper (120‑ and 220‑grit), a screwdriver, and a brush or roller for paint. A level helps keep the rack straight, and a stud finder makes mounting safe. If you have a clamp, it can hold pieces while you drill. A safety glasses pair protects your eyes while you cut.
How can I make sure the rack is safe to hang on my wall?
First find a wall stud using a stud finder or by tapping. Drill a 2‑inch wood screw through the back board into the stud; this gives the strongest hold. If you can’t hit a stud, use a heavy‑duty wall anchor rated for the coat rack’s weight. Test each hook with a heavy coat before you step back. A wobble means the screw isn’t deep enough. Leave a small gap between the rack and wall to let paint breathe.
How often should I maintain the finish on my DIY wooden coat rack?
Give the rack a quick wipe with a damp cloth once a month to clear dust. Check the finish for any dull spots; a thin coat of the same sealant will bring back shine. In a rainy Nova Scotia winter, you might need to re‑seal after a year to protect the wood from moisture. Keep the hooks free of rust by drying them after each use. A soft dry towel helps avoid scratches on the painted surface.
Can I add a shelf or extra hooks to a DIY wooden coat rack?
You can turn a simple rack into a mini entryway station. Cut a narrow board about 4‑inches tall and screw it just below the top hooks; that becomes a shelf for keys or a small plant. To add more hooks, drill extra pilot holes spaced 3‑inches apart and attach matching brackets. Keep the total weight under the capacity of your wall anchors. A painted coat of the same colour ties the new piece together nicely.
What are common mistakes to avoid when building a DIY wooden coat rack?
Skipping the sanding step is a big pitfall; rough wood makes paint bubble and hooks feel rough. Using the wrong screw length can split the board or leave the hook loose. Forgetting to pre‑drill pilot holes often leads to wood cracking. Finally, mounting too high makes coats swing and can damage the wall. Aim for eye level and test with a coat before you finish. A level helps keep the rack straight and looks tidy.


