Coastal Wood Decor: A Maritime‑Inspired Guide to Handcrafted Home Styling
Imagine walking down a weather‑worn wharf in Dartmouth, the salty breeze tugging at your coat while the scent of pine and sea mingles in the air.
That feeling—rugged, soothing, a little bit wild—is exactly what we try to bottle in every piece of coastal wood decor we craft.
Does your living room feel more like a sterile showroom than a place that whispers “home” each time you step through the door? You’re not alone. Many of our fellow Maritime enthusiasts struggle to find décor that feels authentic rather than mass‑produced “beach” trinkets.
What we’ve learned over the years in our Dartmouth workshop is simple: the magic lives in the details. Hand‑painted folk fish, a distressed pine anchor, or a laser‑engraved sign that reads “Beach Rules” become conversation starters because they carry the story of the Atlantic coast.
Here’s the promise of this guide: we’ll show you how to bring that rugged charm into your home without sacrificing quality or sustainability. From choosing the right wood grain that echoes driftwood to pairing it with a finish that resists the sun’s fade—think Benjamin Moore Aura, the paint we trust for durability—every tip is rooted in real, hands‑on experience.
So, picture a cozy nook by the window where a wooden fish art piece hangs above a reading chair, its colors echoing the teal of the Bay of Fundy. Or picture a sturdy pine anchor standing tall on your mantel, reminding you of tide‑timed rhythms each morning.
Does that vision feel within reach? Absolutely. Because each item we offer is handcrafted right here in Nova Scotia, supporting local artisans and the IWK Foundation’s Sofia Daisy campaign. When you choose our coastal wood decor, you’re not just buying a product—you’re inviting a piece of the Atlantic into your daily life.
Ready to start turning those salty‑air dreams into reality? Let’s dive in and explore the simple steps, styling ideas, and thoughtful touches that will make your space feel like a true seaside retreat.
TL;DR
Discover how Atlantic Wood N Wares transforms your home with authentic coastal wood decor that captures Nova Scotia’s rugged charm and lasting quality. We’ll guide you through simple styling tips, sustainable materials, and easy ways to bring salty‑air warmth into any room, instantly, and create a welcoming seaside vibe today for you.
Step 1: Choose the Right Maritime‑Grade Wood
Picture this: you’ve just cleared a little wall in your living room, the paint is still a little tacky, and you’re staring at the empty space wondering what kind of wood will actually feel like a piece of the Atlantic coast. It’s that moment when the decision feels bigger than just “what looks nice?” because the grain, the durability, and the story behind the wood will set the tone for everything else you add later.
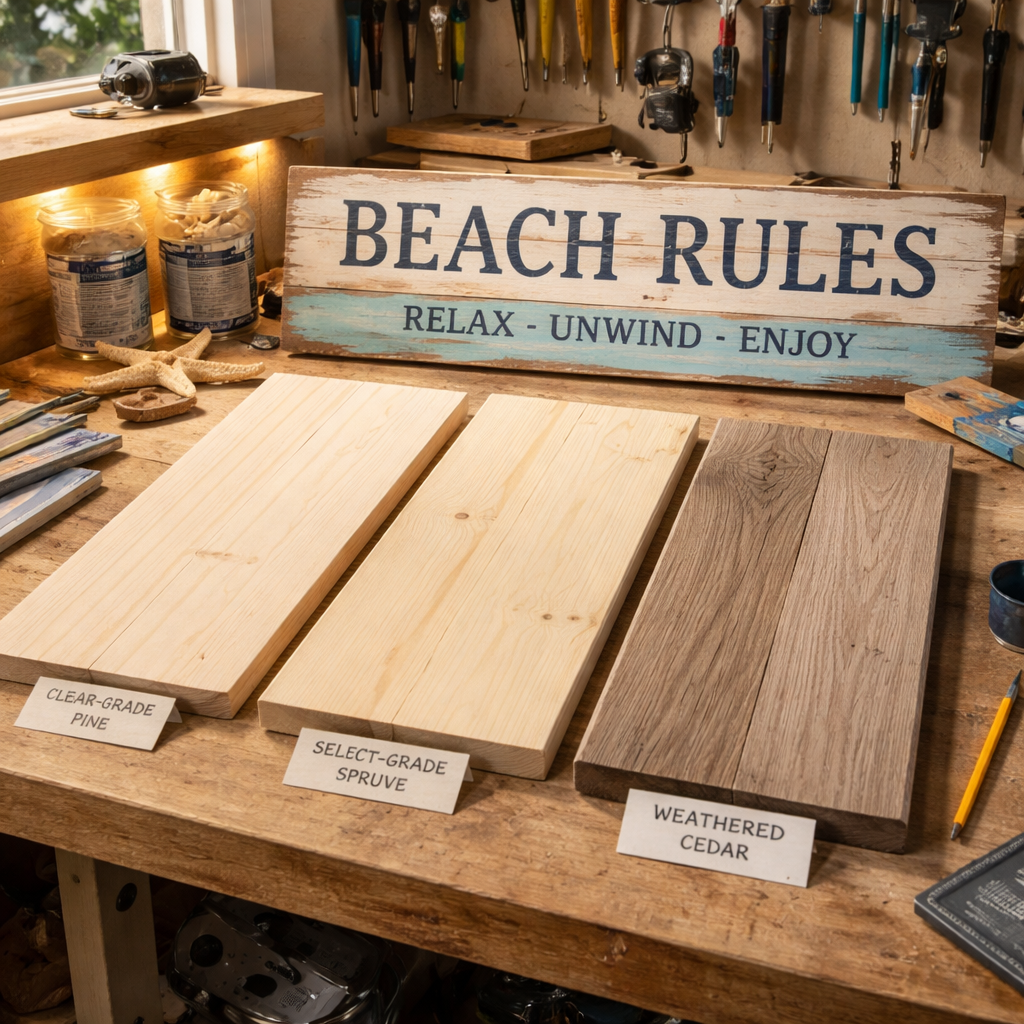
First off, think about the wood’s origin. In Nova Scotia we have access to sturdy pine, resilient spruce, and weather‑worn cedar. Pine is soft enough to let you hand‑paint those delicate “Beach Rules” signs, yet it’s dense enough to stand up to a family dog’s curious nose. Spruce gives you a tighter grain that holds a finish like Benjamin Moore Exterior Aura paint without cracking – perfect for pieces that will see a lot of sunlight. Cedar, on the other hand, brings that natural, salty‑air scent straight into your home, and its natural oils make it naturally resistant to moisture.
But it’s not just about species. Look at the wood’s grade. Maritime‑grade timber is graded for both structural integrity and aesthetic appeal. You’ll see terms like “clear grade” (no knots, uniform grain) and “select grade” (a few character knots that add personality). For a polished wall sign or a sleek anchor, clear grade is your go‑to. For a rustic coffee table or a reclaimed‑look mantel, select grade gives you that lived‑in charm without sacrificing strength.
Now, let’s talk finish. The wood you choose should be compatible with the finish you love. If you’re planning to hand‑paint with a marine‑grade acrylic, make sure the wood is sanded smooth and sealed. If you prefer a natural waxed look, a slightly rougher surface will help the wax sink in and bring out those beautiful grain patterns. And don’t forget UV protection – the Atlantic sun can be fierce, even through windows. A clear UV‑blocking topcoat will keep your colors from fading faster than a tide‑pool sunset.
Here’s a quick checklist you can print and pin on your fridge:
- Identify the wood species that matches your climate and aesthetic (pine, spruce, cedar).
- Choose a grade that balances character and durability (clear vs. select).
- Match the finish to the wood’s texture – smooth for paint, slightly rough for wax.
- Confirm the wood is sourced sustainably – look for FSC or local forest stewardship certifications.
When you’ve narrowed it down, it helps to see the wood in context. One of our favourite pieces that shows how a clear‑grade pine sign can become a focal point is the Relaxing Coastal Decor: Wood Signs: Cottage or Home. It’s laser‑engraved, hand‑painted, and hangs just right above a mantle, proving that the right wood really does make everything else click.
And while you’re planning, consider how lighting will showcase your new wood. Good lighting can accentuate grain, highlight hand‑painted details, and create that cozy, lighthouse‑glow vibe. If you’re looking for a partner who knows how to blend LED brilliance with wooden textures, check out professional lighting solutions that are tailored for residential spaces.
Finally, think about the bigger picture – the room’s layout and any upcoming remodel. If you’re already working with a contractor on a kitchen refresh or an ADU addition, a solid renovation guide can save you headaches down the line. The home renovation guide walks you through prepping walls, setting up proper supports, and ensuring your new wooden pieces will be safely mounted for years to come.
Bottom line: choosing the right maritime‑grade wood is a blend of science (species, grade, finish) and storytelling (where that wood came from, how it fits your life). When you get it right, every subsequent piece – from a hand‑painted sign to a rustic anchor – feels like it was always meant to be there.
Step 2: Finish with Weather‑Resistant, Ocean‑Inspired Colours
Now that your maritime‑grade pine is in hand, the real fun begins: turning that raw grain into a piece that feels like a tide‑kissed boardwalk. The secret? A colour palette that whispers sea‑foam, sand, and sky while standing up to salty air and summer sun.
Start with a light, reflective base
Think of the first light that hits the harbor at dawn – soft, airy, and bright. Light neutrals such as warm whites, pale greys, or a muted sand tone act like a fresh canvas. They bounce natural light, make a room feel larger, and give the wood a subtle glow before any accent colour arrives.
Benjamin Moore’s coastal colour collection is a great place to sample those breezy hues. Their “Swiss Coffee” and “Ocean Breeze” shades are specifically formulated to reflect sunlight without fading, which is perfect for a coastal home.Explore the palette here.
Pick ocean‑inspired accents
Once the base is set, add a splash of colour that feels pulled straight from the Atlantic. Sea‑foam greens, muted blues, and weathered teal work beautifully over pine. They echo the water’s movement without overwhelming the natural grain.
Here’s a quick cheat‑sheet you can stick to your workshop wall:
- Soft teal (think tide‑pool water) – great for a single accent panel or a painted sign.
- Stormy slate blue – works well on larger wall pieces where you want depth.
- Sun‑worn sand – perfect for trim, borders, or a subtle wash over reclaimed slats.
Mix and match, but keep the overall tone muted. The goal is to let the wood’s texture speak louder than the pigment.
Choose a finish that fights moisture
Coastal environments love humidity, salt, and occasional splashes. A paint that can handle those conditions is non‑negotiable. Semi‑gloss or satin finishes are ideal for high‑traffic pieces because they shed water and are easy to clean.
If you’re unsure which product will hold up, the advice from coastal‑home painters on durability is solid. They recommend looking for mildew‑resistant formulas and a primer that seals the wood’s pores.Read their tips here.
In our workshop we often start with a water‑based primer that contains a built‑in moisture barrier, then follow with a two‑coat satin finish of Benjamin Moore Exterior Aura. The result is a colour that stays vivid for years, even on a piece that lives by a sunny window.
Test before you commit
Before you paint the whole batch, grab a scrap piece of the same pine and apply your chosen colour and finish. Let it cure for 24‑hours, then mist it lightly with a spray bottle of salt water. If the paint beads and the wood doesn’t swell, you’ve got a winner.
This low‑tech test mimics the Atlantic’s salty kiss and saves you from a costly redo later.
Apply colour like a pro
1. Sand the surface smooth – a fine‑grain sandpaper (180‑220) removes any dust without dulling the grain.
2. Wipe clean with a tack cloth; any residue will create a patchy finish.
3. Prime with a moisture‑blocking primer. One thin coat is enough; let it dry fully.
4. Paint the base coat, letting it dry to the touch (usually 30‑45 minutes).
5. Add your ocean‑inspired accent coat. Use a brush for small details, a roller for larger panels.
6. Seal with a satin or semi‑gloss topcoat. This final layer locks in colour and adds that weather‑resistant shield.
Tip: Work in a well‑ventilated space and keep a wet‑edge to avoid lap lines. A few extra minutes of patience now saves you brush marks later.
Bring the finish into the room
When the piece is dry, think about placement. A painted pine sign over a mantle catches the morning sun, while a sea‑foam‑hued wall gallery looks fresh beside a large window. Pair the colour with natural linen cushions or a jute rug for a cohesive coastal vibe.
And remember, you don’t need a dozen accessories to feel the ocean – the right colour on the right wood does the heavy lifting. Your coastal wood decor will now stand up to the Atlantic’s mood swings while staying as inviting as a tide‑washed dock.
Step 3: Design Elements – Comparing Popular Coastal Motifs
Picture the moment you step onto a weather‑worn wharf and a wooden lighthouse silhouette catches your eye. That instant feeling – a mix of nostalgia and sea‑spray – is exactly what we aim to bottle in our coastal wood decor.
So, which motif will echo that vibe in your own home? Below we break down the three most‑loved coastal symbols, what they bring to a room, and when each shines brightest.
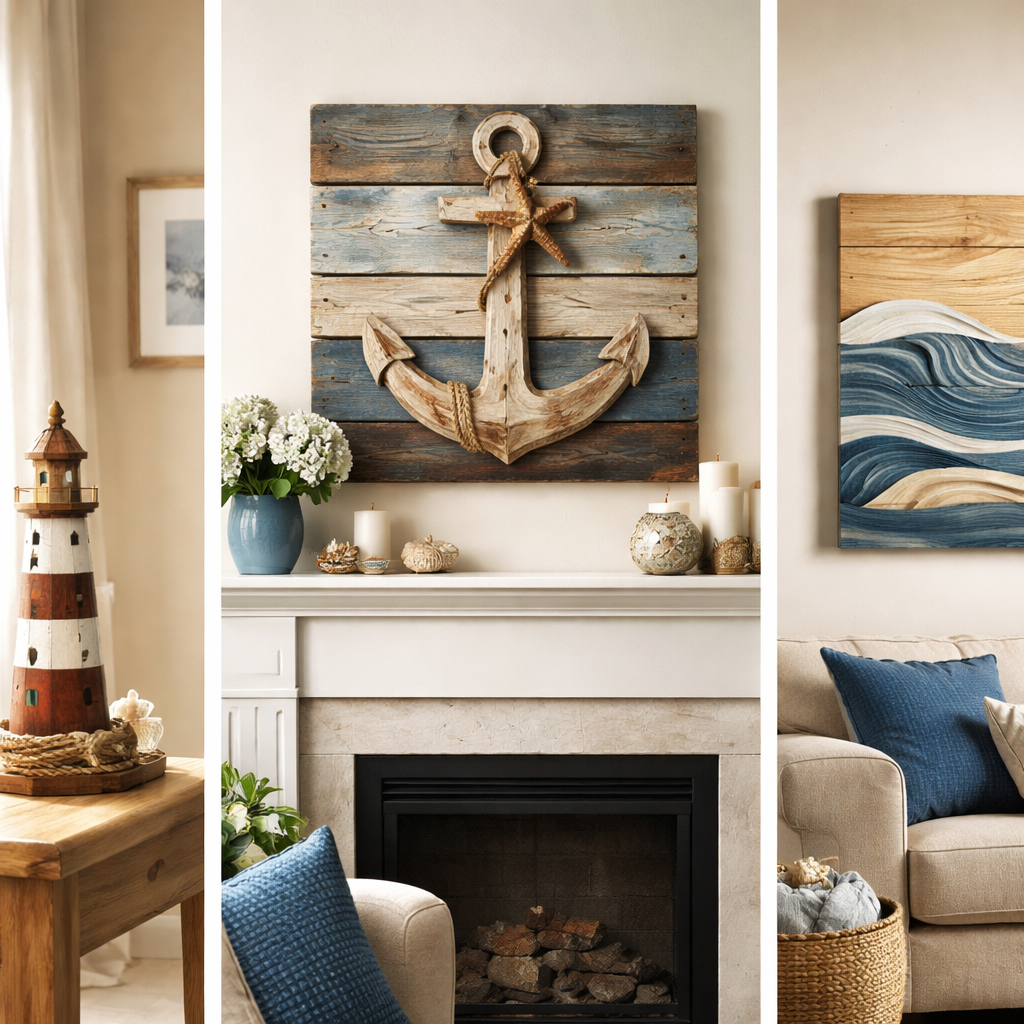
1. The Lighthouse Ornament
Lighthouses have become the poster child for outdoor coastal charm. They’re bold, instantly recognizable, and they double as a gentle beacon guiding guests toward your living space. The yard lighthouse trend shows how a single piece can turn a garden into a nautical retreat.
Think of placing a modest wooden lighthouse on a patio table or mounting a smaller version on a mantel. The weather‑resistant finish we use lets it survive salty breezes without fading.
2. The Anchor Motif
Anchors whisper “steady as the tide.” They work well on smaller surfaces – a sign, a wall shelf, or even a hand‑painted coffee table inset. Because an anchor’s silhouette is compact, it can be layered with other details without overwhelming the space.
Our own Rustic Standing Anchors (hand‑painted with Benjamin Moore Aura) illustrate how a simple shape can anchor a whole room’s colour story.
3. Wave & Sea‑Foam Patterns
Curved, flowing lines mimic the Atlantic’s rhythm. A subtle wave wash across a wooden panel adds movement without shouting. Pair it with a light base coat and a soft teal accent for that “just‑off‑the‑shore” feeling.
For a broader view, the coastal interior design guide highlights how wave motifs blend with natural wood to keep a space airy yet grounded.
Now, how do you decide which one fits your style?
| Motif | Typical Material | Visual Impact | Best Placement |
|---|---|---|---|
| Lighthouse | Hand‑carved pine, marine‑grade paint | Bold focal point, beacon‑like | Outdoor patio, entryway console |
| Anchor | Solid pine, distressed finish | Compact, grounding anchor | Wall shelf, mantel sign, door décor |
| Wave/Sea‑Foam | Reclaimed wood, subtle glaze | Soft movement, airy | Gallery wall, accent panel above sofa |
Here’s a quick decision checklist:
- Do you want a conversation starter? Go lighthouse.
- Need a subtle nod to the sea? Choose anchor.
- Looking for texture that whispers rather than shouts? Pick wave patterns.
And remember, you don’t have to commit to just one. Layer a lighthouse silhouette on a gallery wall alongside a wave‑painted panel, then sprinkle a few anchor charms on a side table. The mix feels lived‑in – like you’ve been collecting sea stories for years.
What about colour? Light neutrals (soft whites, sandy beiges) act as a canvas. Then let the motif’s hue do the talking – a muted teal lighthouse, a weathered iron‑tone anchor, or a pastel sea‑foam wave. The contrast keeps the space from feeling flat while still feeling breezy.
Finally, a tip from the workshop: always test a small scrap with a salt‑water mist before you finish the whole piece. If the paint beads and the wood stays stable, you’ve got a winner for any coastal setting.
Ready to pick your favorite motif? Grab a piece of solid pine, picture where it’ll live in your home, and let the Atlantic’s spirit guide the choice.
Step 4: Incorporate Hand‑Painted Details for Authenticity
Now that you’ve chosen the right maritime‑grade pine and picked a base colour, it’s time to let the piece speak its own story. The magic happens when a simple brushstroke turns a flat panel into a memory of the Atlantic.
Ever wonder why a hand‑painted fish or a tiny lighthouse silhouette feels so much more inviting than a printed decal? It’s the tiny imperfections – the way the paint pools in a grain, the slight wobble of a brush line – that remind us we’re looking at something made by real hands, not a factory press.
Start by sanding the surface to a smooth 180‑220 grit. Wipe away the dust with a tack cloth so the paint adheres evenly. If the wood still feels a little damp, give it a few hours to breathe; a dry surface stops the paint from curling later.
Choose brushes that match the scale of your design. A ½‑inch flat brush works great for broader washes, while a fine‑point liner is perfect for delicate details like a wave curl or a tiny starfish. Natural‑bristle brushes hold more pigment, which gives those richer, slightly textured strokes that feel organic.
Before you dive into colour, lightly sketch your motif with a soft pencil or a faint charcoal line. This step isn’t about perfection; it’s a roadmap that you can adjust as you go. If you’re painting a lighthouse, start with the tower’s silhouette, then add the lantern room as a separate colour block.
When mixing paint, keep the palette muted – think sea‑foam green, weathered teal, or a soft sand‑tone. Add a tiny drop of water to the mix if you want a more translucent wash that lets the wood grain peek through. Remember, coastal wood decor thrives on subtle contrast, not neon pop.
Layering is key. Apply the base colour first, let it dry to the touch (usually 30‑45 minutes), then add your hand‑painted details. Work from the largest shapes down to the tiniest accents. This order prevents accidental smudging and lets each layer settle before the next arrives.
Once the paint is dry, seal the piece with a satin‑finish topcoat – the same Benjamin Moore Exterior Aura we trust for durability. A thin, even coat protects the artwork from humidity and the occasional salty‑air mist that drifts through open windows.
Quick checklist for hand‑painted authenticity
- Sand to 180‑220 grit, wipe clean.
- Sketch lightly; keep lines loose.
- Use natural‑bristle brushes for texture.
- Mix muted, ocean‑inspired pigments.
- Layer from large to small, drying between coats.
- Seal with a satin, moisture‑resistant topcoat.
Picture this: a hand‑painted lighthouse sign hanging above your mantel, the soft teal of the lantern catching the morning sun, the pine grain still visible beneath the paint. A guest leans in, asks where you found it, and you tell the story of a Dartmouth workshop where each brushstroke was guided by the rhythm of the tide.
One final test before you call the piece finished – give it a gentle mist of salt water (just a spray from a bottle). If the paint beads and the wood doesn’t swell, you’ve got a winner that will weather any coastal breeze for years to come.
So, grab that piece of solid pine, set up your brushes, and let the Atlantic’s spirit guide each stroke. Hand‑painted details aren’t just decoration; they’re the soul of your coastal wood decor, turning a simple board into a conversation starter that feels lived‑in, loved, and unmistakably yours.
Step 5: Styling Your Space – Placement & Pairing Tips
We’ve got the wood ready, the paint is dry, and now the fun part begins – figuring out where each piece lives.
Start with the wall real‑estate you have
Look at the room and ask yourself, "Which wall already gets a lot of love?" In a living‑room that faces a big window, the sunlight will make a soft‑toned sea‑foam sign pop. In a hallway, a narrow vertical anchor can break up the length without crowding the space.
And if you’re not sure, grab a piece of cardboard the same size as your decor and tape it temporarily. Walk the room, sit on the couch, and notice how the eye moves. That little experiment often reveals the sweet spot you’d otherwise miss.
Pair by scale, not just theme
Big pieces love big companions. A 24‑inch wooden lighthouse looks stunning above a mantel when you flank it with two smaller pine‑painted shells. The contrast of heights creates a rhythm, much like a tide rolling in and out.
Conversely, a delicate hand‑painted fish works best when you cluster a few similar‑size items – perhaps a trio of reclaimed‑pine panels with subtle wave washes. The cluster feels intentional, not cluttered.
Mix textures for depth
Coastal wood decor isn’t just about colour; it’s about the feel of the grain against a jute rug, a woven basket, or a linen throw. Place a distressed pine anchor on a reclaimed‑wood side table and let the rough rope rope‑detail sit next to a smooth, natural‑fiber cushion. The tactile contrast tells the story of a dockside bench meeting a breezy living‑room.
And don’t forget the ceiling. A slim wooden beam painted in a muted sand tone can echo the floor’s jute rug, pulling the whole room together.
Use colour as a guide, not a rule
We love the ocean‑inspired palette – soft teal, stormy slate, sun‑worn sand. Pick one accent colour from your piece and let it ripple through nearby accessories: a teal ceramic vase, a slate‑blue cushion, or a sand‑coloured picture frame. The result feels cohesive without looking like you forced a match.
If you’re hesitant, test the vibe with a single accent first. Swap out a throw pillow for a colour that mirrors your wood sign; step back and see if the room feels calmer or louder.
Consider traffic flow
Never place a decorative anchor where it blocks a doorway or a high‑traffic path. A piece that catches the eye should also respect movement. In a kitchen, a small wooden fish panel above the spice rack adds charm without intruding on the cooking flow.
And for larger items, give them breathing room. A 30‑inch wall gallery looks best with at least a 6‑inch gap between each frame – the negative space acts like the calm between waves.
Layer with personal stories
One of our favourite tricks is to pair a handcrafted sign with a memory‑triggering object. Imagine a "Beach Rules" wooden sign hanging next to a sea‑glass bowl you collected on a family trip. The combination turns a simple wall into a conversation starter.
Even a tiny detail, like a piece of driftwood you found on the shore, can sit on the same shelf as a hand‑painted lighthouse. It tells a story of where the inspiration came from.
Take advantage of online inspiration
Seeing the ideas in real rooms helps you visualise the placement. A quick look at coastal living‑room galleries on Houzz shows how designers balance large wooden anchors with softer textiles.
For a more narrative take, check out Molly’s take on coastal New England style. Her approach to mixing antiques, rope accents, and painted wood feels right at home in a Nova‑Scotia setting.
So, what’s your next move? Grab the piece you love most, sketch a quick layout on paper, and play with scale, texture, and colour until it feels like the tide has finally settled on your floor.
Conclusion – Bring the Atlantic Breeze Home
We’ve walked through choosing the right maritime‑grade wood, picking ocean‑inspired colours, layering motifs, and adding hand‑painted details. Each step is a way to let the Atlantic whisper through your living room.
So, what’s the next move? Grab the piece that makes your heart skip – maybe a hand‑painted lighthouse sign or a reclaimed‑pine anchor – and give it a place on the wall where the morning light can kiss it.
Remember, coastal wood decor isn’t about stuffing a room with every seashell you can find. It’s about one thoughtful piece that feels like a tide‑washed memory, a conversation starter that says, “I love this shoreline.”
In our workshop we still test every finish with a quick spray of salt water. If the paint beads and the wood stays steady, you’ve got a winner that will stand up to Nova Scotia’s breezy summers for years to come.
Take a moment to sketch a quick layout, play with scale, and trust the grain to guide you. When it feels right, that’s the tide settling – and your space suddenly feels like a true seaside retreat.
Ready to bring a bit of the Atlantic into your home? A single, well‑chosen piece of coastal wood decor can turn any room into a place you’ll want to return to, day after day.
FAQ
What is coastal wood decor, and how is it different from mass-produced beach decor?
Coastal wood decor is handmade, rooted in Nova Scotia’s shoreline, and built to last. It’s not mass‑produced beach kits; it’s wood, grain, and paint studied in Dartmouth. You’ll notice textures from hand‑carved edges to brush‑stroked detail, all finished with marine‑grade clarity. The difference shows in how it feels: inviting, rugged, and ready for daily life beside salt spray and morning light every single day at home.
In our workshop, we focus on authenticity and craftsmanship. Our coastal pieces celebrate local materials and seascape storytelling, so you get a piece that’s as durable as it is characterful. When you invite this decor into your space, you’re inviting a piece of the Atlantic to live with you.
How do you choose wood for coastal decor to resist salt air and humidity?
To survive salt air and humidity, we pick maritime‑grade woods and dry them slowly. Eastern White Pine, Atlantic Cedar, and reclaimed pine or spruce are common. We aim for 8–12% moisture, air‑drying for at least 12 months, then a marine‑safe oil or seal. Then a Benjamin Moore Aura topcoat helps the grain breathe while staying resistant to fading, cracking, and wear in everyday use.
In our experience, locally sourced stock from Dartmouth keeps the coastal look legit and supports regional artisans. We test each finish for salt spray so the piece looks fresh after years on a sunny window ledge.
Which finishes work best for Nova Scotia coastal homes?
Finish matters because Nova Scotia summers aren’t always forgiving. We favor satin or semi‑gloss topcoats that shed moisture and are easy to wipe down. A moisture‑blocking primer helps seal the pores, then two coats of paint or clear sealer lock in color. We also test finishes with a salt‑mist spray to ensure the surface won’t peel or dull over years of sun and weather.
In practice, we apply a moisture barrier first, then a two‑coat satin finish like Benjamin Moore Exterior Aura. It holds up to humidity, cleans easily, and keeps color faithful through the seasons.
Why are hand-painted details important for authenticity?
Hand‑painted details bring authenticity that decals can’t match. We use 180–220 grit sanding, soft sketching, and natural bristle brushes for texture. The goal is subtle, imperfect lines that echo the hand of a craftsman. Layer from large shapes to fine details, then seal with a moisture‑resistant topcoat. The result is a piece that feels lived‑in, with stories your guests lean in to hear today.
One more layer of care: a light salt mist can reveal if the paint sticks to the grain or pools oddly. If it passes, you’ve got a piece that ages gracefully and tells real sea stories.
How should I place coastal wood decor in a small space?
Placement matters as much as the piece itself. In small rooms, scale and light win. Start by testing with a cardboard cutout, then hang where it catches morning sun to enliven grain. Group a few smaller pieces in a loose gallery and leave breathing room. Remember, you’re building a seaside vignette, not a museum wall, let textures, color, and mementos breathe in your space.
Think about traffic flow and symmetry. A single large piece can anchor a wall, while a trio of smaller panels creates a dynamic, breathable collage that feels curated, not crowded.
Can coastal decor from your shop support the local community and sustainability?
Choosing coastal decor from our Dartmouth workshop isn’t just about a pretty room. It’s about supporting local makers and Nova Scotia craft. Our pieces are handcrafted with pine, hand‑painted details, and finishes like Benjamin Moore Aura, created right here. Proceeds support community initiatives like Sofia Daisy. If you’re a conscious shopper, you’ll appreciate the storytelling, quality, and the fact that every piece ages with you.
Shopping Canadian‑made pieces keeps the coastal vibe authentic and provides meaningful work for our region. We strive to be transparent about materials and methods so you can feel good about your purchase and its impact.
How do I care for coastal wood decor to keep it looking fresh for years?
Regular dusting with a soft cloth is enough most days. For deeper cleaning, use a damp microfiber cloth and mild soap, then dry promptly. Avoid abrasive cleaners and direct sun, which can fade paint and dry wood. Reapply a marine‑grade oil or topcoat every few years, and store pieces away from extreme humidity to minimize warping and extend life for longevity in your home.
Keep an eye on joints and finish wear; a small touch‑up with your original paint mix keeps everything cohesive. With simple care, your coastal wood decor will remain a warm, inviting part of your home for decades.
Resources & Further Reading
Looking for a quick cheat‑sheet after you’ve finished your project? Below are a couple of places that keep the coastal wood decor vibe alive without the fluff.
Wood‑source sustainability
If you’re curious about where the pine, cedar or Douglas‑fir in your piece originates, the Canadian Wood BC site breaks down the eco‑credentials of Canadian‑grown species. Their overview of Western Hemlock and Douglas‑fir shows why these woods stay stable in salty air and how they meet strict forest‑management standards – a handy reference when you want to explain the “why” to a friend or a client.
Styling inspiration from the East Coast
For a fresh burst of Atlantic‑inspired ideas, Dabbling & Decorating curates real‑home photos of Newfoundland cottage corners, drift‑wood vignettes and lighthouse‑accented walls. Scroll through their gallery and you’ll spot ways to mix a hand‑painted anchor with a reclaimed‑pine gallery, or how a simple “Beach Rules” sign can become the focal point of a mudroom.
And remember – a short‑term test with a salt‑water mist, the kind we swear by in the workshop, will tell you if any finish you choose can survive the tide. Keep these links handy; they’re the kind of practical, region‑specific guidance that turns a good piece into a beloved heirloom. Feel free to bookmark them for future projects.


